
Free Easy Amigurumi Cat Crochet Pattern
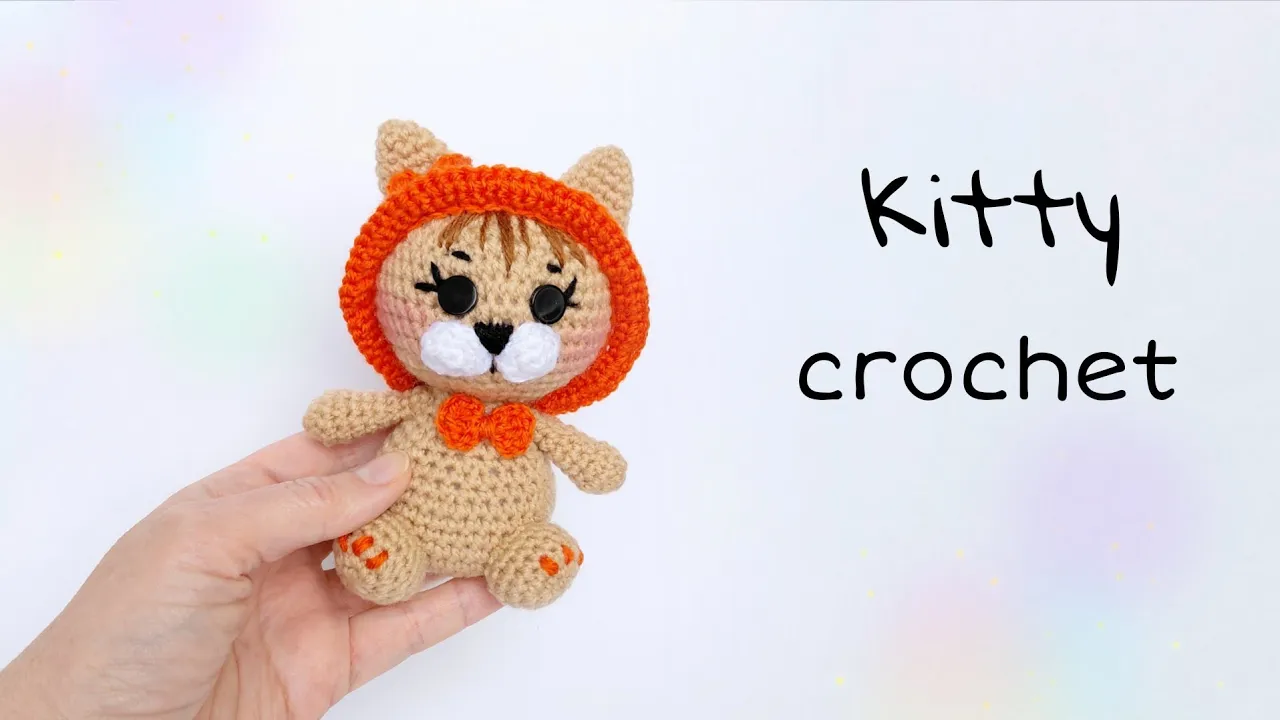
Who doesn't love a squishy little crochet cat to brighten up the day? This free pattern creates an adorable amigurumi kitty that's perfect for gifting, decorating, or just snuggling while you binge-watch your favorite shows.
Simple shapes come together quickly, and the end result has that irresistible charm—big eyes, perky ears, and a curly tail that makes everyone smile.
Best part? You can whip one up in an evening with basic stitches and affordable yarn.
Why You'll Love This Free Crochet Cat Pattern
Cats dominate the internet for a reason—they're endlessly entertaining. Crocheting one captures that playful spirit without the litter box duties.
This pattern uses classic amigurumi techniques to build a chubby, huggable friend that's about 8 inches tall when finished.
On Ravelry, softies like cats top the crochet category with over 91,000 patterns listed as of early 2023, and animal amigurumi remains a huge trend into 2025.
Pick worsted-weight acrylic like Red Heart Super Saver (still around $5-6 per skein at major retailers) or Big Twist Value for a budget-friendly build.
One skein handles the main body, with scraps for accents.
Materials Needed
Gather just a few basics, and you'll be ready to start this kitty in no time.
The pattern calls for about 100-150 yards of worsted-weight yarn for the main color, plus small amounts for accents like the nose or inner ears.
You'll need a size E-4 (3.5 mm) or F-5 (3.75 mm) crochet hook—whichever gets you close to gauge.
Stuffing is essential; poly-fil remains the go-to, with a 12-ounce bag (around $6-8 at most craft stores) lasting for several plushies.
Safety eyes are optional but add that professional pop—grab 12mm or 15mm black ones for about $4 per pack of 20.
A yarn needle, stitch markers, and scissors round out the list.
Everything fits easily into a small project bag.
If you're new to amigurumi supplies, peek at the easy crochet patterns for beginners post for more starter tips.
One reader once forgot stuffing mid-project and improvised with yarn scraps—adorable, but lumpy!
Stick to proper fiberfill for that even squish.
These items are all beginner-friendly and widely available online or in stores.
Best Yarn Choices for Free Crochet Cat Pattern
Worsted-weight acrylic tops the list for this cat—it's affordable, durable, and gives crisp stitch definition without gaps.
Red Heart Super Saver remains a classic: 7-ounce skeins run about $3.77-$5 at major retailers like Walmart as of early 2026, with hundreds of colors and no-dye-lot solids for easy matching.
It washes beautifully, perfect for kid gifts.
For something softer, try alternatives to the discontinued Big Twist Value—many now reach for Lion Brand Vanna's Choice or Premier Anti-Pilling Everyday Worsted.
If plush is the goal, chenille yarns dominate 2025-2026 amigurumi trends.
Premier Parfait XL creates the velvety, huggable texture everyone loves—7-ounce skeins around $7-10, in gorgeous shades.
It works up fast on larger hooks for bigger cats.
Hobbii Honey Bunny offers similar softness at competitive prices (around $12 per 100g skein), with subtle sheen and OEKO-TEX certification.
Scraps work great for stripes or cheeks.
Check the best yarn for plushies roundup for more chenille comparisons.
Beginners often worry about splitting—choose tightly plied options like these to avoid frustration.
Once, a loose chenille turned a cat into a fuzzy monster; switching to Parfait XL saved the day.
Experiment with what feels good in your hands.
Gauge, Size Guide & Must-Have Tools
Gauge isn't super strict for amigurumi, but aim for about 5 single crochet stitches per inch in the round with your chosen yarn and hook.
That keeps stuffing hidden and the fabric firm.
The finished cat measures around 8 inches tall with worsted yarn and a 3.5mm hook.
Want a mini version? Drop to DK weight (see the dk-vs-worsted-weight-yarn-comparison) and a 3mm hook for a 5-6 inch kitty.
Go chunky with jumbo chenille and a 6-8mm hook for a 12+ inch cuddler.
Clover Amour hooks are worth the investment—individual sizes about $8-10, sets around $90-95.
The ergonomic grip reduces hand fatigue, especially during those long increase rounds.
Pair with locking stitch markers to track spiral starts.
A good yarn needle (tapestry style) makes sewing pieces seamless.
For size tweaks, swatch a small circle first.
Many crocheters find going down one hook size tightens everything perfectly.
Trouble with wobbly legs? Firmer tension or smaller hook helps.
Tools like these turn good projects into great ones.
Dive into the best yarn winders for crocheters if skeins drive you nuts.
Your cat will come out just right with a little practice.
Pattern Notes & Tips Before You Start
Take a deep breath—this pattern is truly forgiving and designed with beginners in mind.
All pieces work in continuous spirals, so no need to join rounds unless specified.
Use a stitch marker to track the start of each round; it saves so much counting frustration.
Stuff firmly but gradually—add poly-fil as you go to avoid lumps or overstuffing the neck area.
For safety eyes, insert them between rounds 10 and 11 of the head, about 8 stitches apart.
Important safety note: If making this cat for a child under 3, embroider the eyes instead of using plastic safety eyes to prevent choking hazards.
Many crocheters skip the magic ring and chain 2 + single crochet into the first chain; both work fine here.
Tension matters more than gauge—keep stitches tight to hide stuffing.
If holes appear, drop to a smaller hook mid-project.
One time, a loose start turned the head wobbly, but tightening up fixed it perfectly.
See more beginner amigurumi tips in the easy crochet patterns for beginners guide.
Chenille yarns can be tricky with frog hair—work slowly and use good lighting.
This cat comes together piece by piece, so celebrate each finished part.
Abbreviations Explained
This pattern uses standard US crochet terms—nothing exotic.
ch – chain: Yarn over and pull through loop on hook. Use for starting tails or small details.
sc – single crochet: Insert hook, yarn over, pull up loop, yarn over, pull through both loops. The main stitch here—forms tight fabric ideal for amigurumi.
inc – increase: Work 2 single crochet in the same stitch. Builds shape quickly; place evenly for smooth curves.
dec – decrease (invisible decrease recommended): Insert hook into front loops only of next two stitches, yarn over, pull through both, yarn over, pull through remaining loops. Keeps surface smooth without bumps.
sl st – slip stitch: Insert hook, yarn over, pull through stitch and loop on hook. Great for joining or finishing.
mr – magic ring: Loop yarn around fingers, work stitches into ring, pull tail to close. Perfect start for heads and bodies—no hole in the center.
BLO – back loop only: Work into the back loop for texture on ears or paws.
FLO – front loop only: Similar but opposite—creates ridges when needed.
rnd(s) – round(s): Since we spiral, just keep going.
st(s) – stitch(es): Basic counting unit.
For visual help with any of these, check the free crochet circle pattern tutorial or the easy amigurumi cat crochet pattern.
New to increases? Practice a small ball first—many do the same with the free crochet bunny pattern.
These abbreviations keep instructions concise, but read them fully before starting.
You'll catch on fast—most rounds repeat simple patterns.
Step-by-Step Free Crochet Cat Pattern
Ready to bring this little kitty to life? This classic amigurumi cat stands about 8 inches tall with worsted yarn and a 3.5mm hook.
Work everything in continuous spirals unless noted—mark that first stitch faithfully.
Stuff as you go, adding more right before closing sections.
If gaps show, tighten tension or drop hook size.
Many crocheters love how the head and body shapes emerge round by round.
Let's dive in.
Head (Main Color)
Start with a magic ring for a tight center—pull it snug after round 1.
Rnd 1: 6 sc in mr (6)
Rnd 2: inc x 6 (12)
Rnd 3: (sc, inc) x 6 (18)
Rnd 4: (sc 2, inc) x 6 (24)
Rnd 5: (sc 3, inc) x 6 (30)
Rnd 6: (sc 4, inc) x 6 (36)
Rnd 7: (sc 5, inc) x 6 (42)
Rnd 8: (sc 6, inc) x 6 (48)
Rnd 9-16: sc in each st (48) — that's 8 rounds total
Insert 12-15mm safety eyes between rnds 12 and 13, about 10 sts apart.
Count carefully for symmetry.
Rnd 17: (sc 6, dec) x 6 (42)
Rnd 18: (sc 5, dec) x 6 (36)
Rnd 19: (sc 4, dec) x 6 (30)
Rnd 20: (sc 3, dec) x 6 (24)
Stuff the head firmly now—shape it round.
Rnd 21: (sc 2, dec) x 6 (18)
Rnd 22: (sc, dec) x 6 (12)
Rnd 23: dec x 6 (6)
Fasten off, thread tail through front loops, pull tight to close.
Weave in end.
Ears (Make 2, Main Color)
Rnd 1: 6 sc in mr (6)
Rnd 2: (sc, inc) x 3 (9)
Rnd 3: (sc 2, inc) x 3 (12)
Rnd 4: (sc 3, inc) x 3 (15)
Rnd 5: (sc 4, inc) x 3 (18)
Rnd 6-8: sc in each st (18)
Fasten off, leaving long tail for sewing.
No stuffing needed—flatten them slightly.
Pinch base for a perky look.
Body (Main Color)
Rnd 1: 6 sc in mr (6)
Rnd 2: inc x 6 (12)
Rnd 3: (sc, inc) x 6 (18)
Rnd 4: (sc 2, inc) x 6 (24)
Rnd 5: (sc 3, inc) x 6 (30)
Rnd 6: (sc 4, inc) x 6 (36)
Rnd 7-12: sc in each st (36)
Rnd 13: (sc 4, dec) x 6 (30)
Rnd 14-15: sc in each st (30)
Rnd 16: (sc 3, dec) x 6 (24)
Rnd 17-18: sc in each st (24)
Stuff body here.
Rnd 19: (sc 2, dec) x 6 (18)
Fasten off, leaving long tail for sewing to head.
Add more stuffing if needed for plumpness.
Arms (Make 2, Main Color)
Rnd 1: 6 sc in mr (6)
Rnd 2: inc x 6 (12)
Rnd 3: (sc 3, inc) x 3 (15)
Rnd 4-6: sc in each st (15)
Rnd 7: (sc 3, dec) x 3 (12)
Rnd 8-12: sc in each st (12)
Lightly stuff lower part.
Rnd 13: (sc 2, dec) x 3 (9)
Fasten off, leave tail.
Flatten top, sew closed if desired.
Legs (Make 2, Main Color)
Rnd 1: 6 sc in mr (6)
Rnd 2: inc x 6 (12)
Rnd 3: (sc, inc) x 6 (18)
Rnd 4-6: sc in each st (18)
Rnd 7: (sc, dec) x 6 (12)
Rnd 8-13: sc in each st (12)
Stuff firmly at bottom, lighter at top.
Fasten off, leave tail.
Tail (Main Color)
Rnd 1: 6 sc in mr (6)
Rnd 2: (sc, inc) x 3 (9)
Rnd 3-15: sc in each st (9) — adjust length as liked
Lightly stuff.
Fasten off, leave tail.
Curve it gently when attaching.
Assembly and Finishing
Lay out all pieces first—position arms at sides of body, legs at bottom, tail curved to one side.
Sew arms to body around rnds 16-18.
Attach legs slightly forward for sitting pose.
Pin head to body neck opening, matching stitch counts.
Whipstitch securely—go around twice for strength.
Sew ears on top of head, about 6 rounds apart.
Embroider nose with pink yarn: small upside-down triangle between eyes.
Add whiskers with black thread or leave plain.
For a scarf or bow, scraps work wonders.
One crocheter added stripes by changing colors mid-round; it turned out stunning.
Your cat is complete—give it a gentle hug.
These make wonderful gifts or shelf sitters.
Share your version; variations always inspire.
Easy Variations & Custom Ideas
Switching colors opens endless possibilities with this basic cat shape.
Try a calico look: main body in white, then add orange and black patches on the head and body before assembly.
Siamese style works beautifully—cream body with dark brown ears, face mask, legs, and tail tip.
Tabby stripes? Carry contrasting yarn along for simple surface crochet lines after finishing.
Many crocheters in 2025-2026 are loving realistic breeds like these; patterns for calico, tabby, and Siamese variations remain top searches.
Add personality with tiny accessories—crochet a quick bow, scarf, or hat from scraps.
A simple chain scarf takes minutes and makes the kitty gift-ready.
Halloween versions with witch hats or mummy wraps are trending right now.
Make a whole family: enlarge with chunky yarn like Premier Parfait XL (around $7-10 per skein early 2026) for a jumbo cuddler.
Shrink it down using DK weight—see the dk-vs-worsted-weight-yarn-comparison for tips.
One reader turned theirs into ornaments by adding hanging loops.
Another attached them to keychains.
Look at similar animal ideas in the free crochet bunny pattern or free crochet chicken pattern for more customization inspiration.
These small changes make each cat uniquely yours.
Common Troubleshooting and Fixes
Gaps showing stuffing? Most often from loose tension or too-large hook.
Switch down a size—many fix it instantly.
Hold swatch to light; little should shine through.
Head coming out elongated instead of round?
Count stitches religiously each round—missing one throws everything off.
Use locking markers and check at round end.
If using chenille, it stretches; try yarn-under single crochet for tighter fabric.
Wobbly neck or leaning body?
Stuff firmer at joins and pin pieces before sewing.
Sew head twice around for stability.
One time, a cat kept flopping forward—adding extra stuffing under the chin solved it.
Stitches twisting in spiral?
Shift increases around instead of stacking them.
That prevents hexagon shapes.
For more shaping help, peek at the easy crochet dog pattern free amigurumi tutorial.
Eyes uneven?
Place safety eyes before stuffing fully—easier to adjust.
Mark spots with pins first.
Counting wrong? Use tally counter app or paper marks.
Everyone miscounts sometimes; frog gently and restart the round.
These fixes turn frustrating moments into learning wins.
Next-Level Tips
Master the invisible decrease—front loops only for seamless shaping.
It elevates the whole look.
Seamless color changes: pull new color through last two loops of previous stitch.
No jogs at round starts.
For perfect spheres, offset increases each round.
Start with 7 stitches in magic ring sometimes for even flatter circles.
Add wire armature inside limbs for posable cats—thin floral wire works.
Brush chenille lightly with velcro for extra fluff.
Embroider details last: satin stitch noses, French knots for whiskers.
Weight the bottom with plastic pellets in a stocking pouch for sitting stability.
Many advanced makers swear by bent tapestry needles for assembly—easier maneuvering.
Check yarn choices in best yarn for plushies for premium textures.
Block pieces lightly if using acrylic—steam shapes ears perfectly.
Practice on scraps first.
Your cats will go from cute to professional with these touches.
You Might Also Love These Patterns
Free Crochet Bunny Pattern – An adorable amigurumi rabbit that's just as huggable and beginner-friendly.
Easy Crochet Dog Pattern Free Amigurumi Tutorial – The perfect puppy pal to pair with your cat for a whole plush menagerie.
Free Crochet Chicken Pattern – A quirky farmyard friend with the same simple shaping techniques.
Crochet Octopus Pattern – Tentacles add fun texture while keeping it easy and squishy.
Free Crochet Butterfly Pattern Easy – Delicate wings make a quick appliqué or standalone softie.

The Author
I'm Joanna T. Grey. I've been designing crochet patterns for over a decade, and I focus on modern, wearable pieces with clear, tested instructions. Every pattern here is written so you actually understand the why behind each step—not just what to do. Even if you're new or experienced, you'll find practical guidance and designs that work.


