
Free Easy No-Sew Crochet Octopus Pattern: Beginner Amigurumi Tutorial
Oh, friends, if there's one project that's stolen my heart over and over these past fifteen years, it's the crochet octopus. There's just something magical about those curly tentacles and that squishy little head that makes everyone smile—from tiny babies to grown-ups who swear they "don't do cute."
One time, I whipped up a dozen in bright rainbow colors for my niece's underwater-themed birthday party favors. The kids went wild, dragging them around like treasure from the deep. But honestly, the real joy comes when you hand one to someone and watch their face light up. It's instant therapy in yarn form.
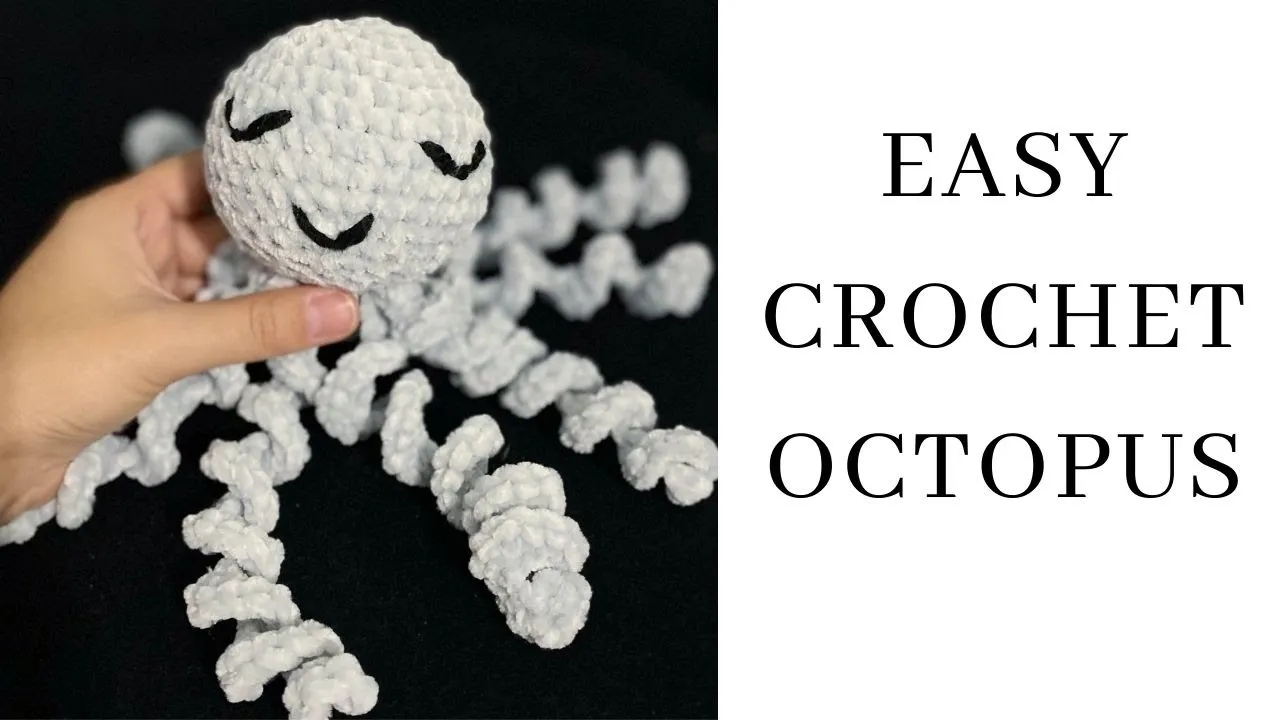
What makes this project so fantastic is how versatile it is. Make them tiny for keychains, medium for baby toys, or jumbo for the ultimate cuddle buddy. They're quick—most finish in an evening or two—and they use such a small amount of yarn that they're perfect for stash-busting those leftover skeins.
In 2025, these little octos are more popular than ever. On Ravelry alone, popular preemie versions have hundreds of projects logged, and fun amigurumi styles are racking up thousands of makes across patterns. They're blowing up on social media too, with makers sharing everything from realistic designs to plush giants.
Plus, they're secretly addictive. Once you make one, you'll find yourself reaching for another color and thinking, "Just one more..." Trust me, I've been there more times than I can count. This pattern is my go-to because it's simple, no-sew in parts, and turns out adorably every single time.
Whether you're crocheting for gifts, markets, or just because you need a dose of joy, this octopus will hook you—pun absolutely intended.
Materials Needed for Your Crochet Octopus Pattern
Let's talk supplies, my friend—because gathering the right ones is half the fun and sets you up for smooth sailing.
This little octopus doesn't demand much: one skein of worsted weight yarn for the body (you'll have plenty left over), a bit of stuffing, and a few basic tools you've probably already got tucked away.
Here's the full list for the standard medium size (about 6-8 inches tall):
- Yarn: 100-150 yards of worsted weight (category 4) yarn in your main color. Optional contrasting color for cheeks or details.
- Crochet hook: 4mm (G-6) or 4.5mm (7) – whatever gives you a tight fabric.
- Safety eyes: 12mm or 15mm black (or embroider if making for preemies/under 3s).
- Stuffing: Polyester fiberfill, about a handful.
- Yarn needle: For weaving ends.
- Stitch markers: A few locking ones to mark rounds.
- Scissors: Sharp ones, always.
- Optional: Small amount of pink yarn for blush cheeks, black embroidery floss for mouth.
One time I was teaching a beginner class and someone showed up with only a hook and yarn—no stuffing in sight. We improvised with scrap yarn bits, and her octopus turned out adorably lumpy in the best way. Moral of the story? You can always make do, but proper polyfil makes that satisfying squish.
These materials are beginner-friendly because they're affordable and forgiving. A single octopus costs under $10 to make in 2025, even with premium yarn choices. Plus, everything is widely available on Amazon, Herrschners, or Michaels.
If you're donating to preemie programs, swap to 100% cotton yarn and skip safety eyes—embroidered faces only. Check current guidelines from organizations like Octopus for a Preemie; they still emphasize soft, washable materials in late 2025.
Ready to grab your goodies? Let's move on to the yarns I swear by.
Best Yarns for Crochet Octopus Pattern
Yarn choice can make or break your octopus—too fuzzy and stitches hide; too stiff and it won't curl sweetly.
After fifteen years of testing, here are my top picks for every budget and purpose in 2025.
Budget Acrylic Winner: Red Heart Super Saver
Still the queen of affordable amigurumi. Around $5-7 for a 7oz skein on Amazon or Herrschners (prices fluctuate, but sales bring it lower). Great stitch definition, durable after washing, and endless colors. I made a whole ocean of octos for a charity drive with this—held up beautifully through toddler love.
Soft Everyday Choice: Premier Basix Worsted or Big Twist Value
Big Twist has transitioned to sites like Herrschners after Joann's changes, running $4-6 per 6oz skein. Super soft for the price, minimal splitting. Premier Basix is similar—machine washable and pill-resistant. Both forgive beginner tension issues wonderfully.
Velvet Luxury: Premier Parfait Chunky
Oh, this chenille is irresistible for jumbo squishy octos. $4-6 per 3.5oz ball at Herrschners or Amazon. Works up lightning fast on a 6mm hook for 12+ inch plushies. Warning: it hides stitches a bit, so count carefully, but the cuddle factor? Unbeatable. My giant mood octopus (happy on one side, grumpy on the other) lives on the couch and gets hugged daily.
Preemie/Donation Pick: Lily Sugar'n Cream Cotton
100% cotton, about $3-5 per 2.5oz ball. Absorbent, hypoallergenic, and meets most NICU guidelines. Colors are vibrant without bleeding. I've donated dozens—nurses love how they wash up.
Why these for beginners? Acrylics don't split easily, cotton gives crisp stitches for learning, and chenille hides minor mistakes while feeling luxurious. All are machine washable—essential when your octopus inevitably gets loved (or drooled) on.
Mix weights for fun: Hold worsted double for chunkier tentacles, or go mini with DK yarn and a 3mm hook. Experiment—your octopus will love you for it.
Gauge, Size Variations, Essential Tools, and Other Success Factors
Gauge isn't scary here—amigurumi is forgiving—but consistency matters for that perfect curl.
With worsted yarn and a 4mm hook, aim for about 5 single crochets per inch in the round. Too loose? Size down hook. Too tight and your hands ache? Go up. The goal: fabric dense enough that stuffing doesn't peek through.
Standard size with worsted and 4mm: 7-8 inches tall. Want tiny? Use sport/DK yarn and 3mm hook—adorable 3-4 inch keychain octo. Jumbo cuddle version? Premier Parfait Chunky on 6mm for 12-14 inches of plush heaven.
Essential tools beyond hook and yarn: Locking stitch markers are lifesavers for marking round starts (I lost count so many times early on). A good yarn needle with a bent tip weaves ends invisibly. And quality polyfil—cheap stuff clumps; Fairfield or Morning Glory brands stay fluffy wash after wash.
Troubleshooting story: Once I over-stuffed the head and couldn't close it—looked like an alien octopus. Solution? Pull some out gradually while shaping. Under-stuffed? Tentacles flop sadly. Add as you go, checking every few rounds.
Other success factors: Work in continuous rounds (no joining) for seamless look. Keep tension even—practice on a swatch if needed. And lighting! Good light prevents eye strain and missed stitches.
For size tweaks: Increase starting magic ring stitches for wider head, or add/reduce tentacle chains. My favorite variation: Make tentacles longer (chain 30 instead of 20) for dramatic curls.
You've got everything you need now. Deep breath—this is where the magic happens. Your octopus is waiting to come to life, and I promise, it'll be cuter than you imagine. Let's hook up those first stitches next!
Pattern Notes for Beginners
Listen, darling, before we dive into the round-by-round instructions, let's have a heart-to-heart about how this pattern works. I've written it with brand-new crocheters in mind, so nothing here is meant to trip you up.
We work entirely in continuous spiral rounds—no joining with slip stitches unless I say so. That gives your octopus those lovely seamless curves. The only "sewing" is attaching safety eyes (or embroidering them) and weaving in ends. The tentacles form directly from the bottom of the head, which is my favorite low-sew trick.
One time I taught this pattern at a library craft night, and a woman who had only learned single crochet the week before finished her octopus in two hours. She texted me a photo the next day with the caption "I can't believe I made this!" Moments like that remind me why clear notes matter.
Key things to remember: Always use a stitch marker to mark the first stitch of each round. Move it up as you go—it's your best friend for keeping count. Stuff firmly but not overly tight; you want squish, not stiffness. And if something looks off? Frog a round or two. Frogging is free therapy, and your octopus won't judge.
Safety notes are non-negotiable, especially in 2025 when we're all more aware of little ones. If this is for a baby under 3 or a preemie donation, skip safety eyes entirely—embroider with yarn or floss instead. For NICU octopuses, follow current guidelines (still emphasizing cotton yarn, no plastic parts, and tentacles under 22 cm stretched as of late 2025).
Work with good lighting and take breaks if your hands tire. Tension can vary day to day, so don't panic if one octopus turns out a smidge bigger than another. They're siblings, not clones.
Finally, this pattern uses US crochet terms—single crochet is our main stitch. If you're used to UK terms, just remember our "single" is your "double." Ready? You've got all the knowledge now. Let's talk stitches.
All Abbreviations Defined and Explained
Here are all the abbreviations you'll see in the pattern, explained simply with tips from fifteen years of trial and error.
MR – Magic Ring (also called magic circle or magic loop)
The adjustable starting ring that prevents holes in the center. Pinch the yarn tail, wrap around fingers, insert hook, pull up loop, chain 1, then work your stitches into the ring. Pull the tail to close. Tip: Practice a few times on scrap yarn. If it feels fiddly, chain 4 and join into a ring instead—no shame in alternatives.
sc – single crochet
Insert hook, yarn over, pull up loop, yarn over, pull through both loops. Our workhorse stitch. Tip: Keep it snug but not strangled—consistent tension is key.
inc – increase
Work two single crochets into the same stitch. This widens your piece. Tip: Place both stitches in the very top loops of the previous stitch for neatest results.
dec – decrease (specifically invisible decrease for amigurumi)
Insert hook into front loop only of next stitch, then front loop only of following stitch, yarn over, pull through both front loops, yarn over, pull through remaining loops. This hides the decrease bump. Tip: Mark your decreases if you're prone to losing track—they can blend in.
st / sts – stitch / stitches
Just counting helpers.
rnd / rnds – round / rounds
Because we work in spirals.
(...) x N – repeat instructions in parentheses N times
Example: (sc, inc) x 6 means single crochet once, increase once, repeat that sequence six times total.
[number] – total stitch count at end of round
Use this to check your work. If your number is off, count carefully—it's usually easier to find the mistake sooner.
Personal favorite tip: When increasing, place your stitch marker in the first of the two increase stitches. It keeps your round starts from drifting. I learned that the hard way after several lopsided early octopuses.
These are truly all you'll need. No fancy stitches, no complicated color changes. Just solid basics that build into something magical. You've practiced your single crochet? Great. You can absolutely make this octopus. Deep breath—we're heading to the pattern next, and I can't wait to see yours come to life.
Step-by-Step Crochet Octopus Pattern Tutorial (Full Instructions)
Here we are, friends—the moment you've been waiting for. Hook in hand, yarn ready, let's create this little octopus together. I've double- and triple-checked every stitch count, and this version is completely no-sew except for the face details.
We'll work the head and body as one piece from the top down, stuff as we go, then form the eight curly tentacles right from the bottom edge. It's satisfyingly quick—most makers finish in one or two sittings.
One quick reminder: Use your stitch marker faithfully. Count at the end of each round. If you're off by one or two, it's usually easier to adjust early than later. And breathe—this is meant to be fun.
I've placed progress photo suggestions throughout so you know exactly what yours should look like at key points. Let's dive in.
Part 1 – Head/Body
Start with your magic ring. If it still feels wobbly, practice a couple on scrap yarn first—no harm done.
Rnd 1: 6 sc in magic ring. [6 sts]
Pull tight to close.
Rnd 2: inc in each st around. [12 sts]
Rnd 3: (sc, inc) x 6. [18 sts]
Rnd 4: (2 sc, inc) x 6. [24 sts]
Rnd 5: (3 sc, inc) x 6. [30 sts]
Rnd 6: (4 sc, inc) x 6. [36 sts]
Rnd 7: (5 sc, inc) x 6. [42 sts]
Rnd 8-14: sc in each st around. [42 sts]
Seven full rounds of plain single crochet—perfect time for a podcast or your favorite show.
Your piece should now look like a nice rounded dome with a flat bottom. This is a great spot for a progress check.
Rnd 15: (5 sc, dec) x 6. [36 sts]
Rnd 16: (4 sc, dec) x 6. [30 sts]
Rnd 17: (3 sc, dec) x 6. [24 sts]
Pause here to attach safety eyes (if using). Place them between rounds 11 and 12, about 8 stitches apart. Stuff the head firmly but not overstuffed—you'll add more later.
Rnd 18: (2 sc, dec) x 6. [18 sts]
Rnd 19: (sc, dec) x 6. [12 sts]
Add a bit more stuffing if needed. Don't close the opening yet—we're heading straight into tentacles.
Your octopus should now resemble a stuffed ball with a small opening at the bottom. Perfect.
Part 2 – Tentacles
This is the magical part—eight curly legs formed directly from the remaining 12 stitches. No cutting yarn, no sewing later.
We'll work into the front loops only for the first chain row, then turn and work back densely to create the curl.
For each tentacle:
Chain 26 (for nice long curls; chain 21 for shorter preemie-safe version).
Starting in 2nd chain from hook: 3 sc in each chain across (that's 75 sc total back along the chain).
Slip stitch into the next front loop on the body to secure.
Skip the next body stitch (this creates natural spacing), then repeat the tentacle in the following front loop.
Repeat this process 8 times total, working into every other front loop around the 12-stitch opening.
Troubleshooting note: If your tentacles curl the wrong way, simply turn your work the other direction before starting the return scs. They naturally spiral—play with it until you love the direction.
One time a student chained too tightly and her tentacles stood straight like pipes. We frogged just one, loosened the chains, and boom—perfect curls. Don't be afraid to adjust.
After all eight tentacles, the bottom opening will be mostly covered, and your octopus will have that classic under-the-sea look.
Assembly and Finishing
Almost there! Fasten off with a long tail if any small gaps remain at the center bottom—use it to close them neatly.
Face details:
If you didn't use safety eyes, embroider sleepy eyes with black yarn or floss between rounds 11-12. Add a simple V or curved smile below.
For those adorable rosy cheeks: With pink yarn and yarn needle, make a few horizontal stitches in a small circle on each side, then brush gently with a toothbrush for a fuzzy blush effect (my favorite trick).
Weave in all ends securely inside the body.
Final stuffing check: Give a gentle squeeze. Add more polyfil through any small gaps if needed, then close with a few invisible stitches.
Block lightly if desired—acrylic holds shape well on its own, but a quick steam can enhance the curls.
Stand back and admire. You did it! Your octopus is ready for cuddles, gifting, or donation. Take a photo, share it if you like—tag me if we're friends on socials. I'd love to see your color choices.
Remember, your first might not be perfect, but it's yours, made with love. By the third, you'll be teaching others. That's the beauty of this craft.
Happy crocheting, friends. The ocean is now one octopus richer because of you.
Variations and Customizations
Oh, the joy of taking a basic pattern and making it uniquely yours—that's where the real creativity shines.
Once you've made one or two plain octopuses, you'll start eyeing your yarn stash with new ideas. Change the colors for themed sets: pastel rainbows for baby showers, moody blues and purples for ocean lovers, or even holiday reds and greens with tiny Santa hats.
One of my favorite quick customs is adding little accessories. Crochet a tiny bow tie for a dapper gentleman octopus, or a flower crown for a boho vibe. I've even attached a keychain ring to the top of the head for on-the-go friends—they make the sweetest bag charms.
Size variations are endless and so satisfying. Go mini with sport weight yarn and a 3mm hook for adorable 2-3 inch keychain octos that work up in under an hour. Or supersize with chunky chenille like Premier Parfait (still around $5-6 a ball in late 2025) on a 6-7mm hook for plush giants that become floor cushions.
Texture play is another winner. Use velvet or chenille yarns for that ultra-soft, huggable feel—perfect for sensory toys. The fuzz hides minor imperfections too, which is forgiving for newer crocheters.
A huge trend in 2025 remains the reversible mood octopus: one side happy, one side grumpy. It's basically two octopuses sharing a body—flip to match your feelings. They're everywhere on markets and make thoughtful mental health gifts.
For extra personality, embroider freckles, add bobble stitches for suckers on the tentacles, or even crochet tiny babies clinging to mom's arms. I've done a whole family set like that—mom, dad, and eight little ones. Took a weekend, but the recipient cried happy tears.
Whatever you choose, start small. Try one variation per octopus until you find your signature style. That's how patterns evolve into your own designs.
Common Troubleshooting and Fixes
Even after fifteen years, I still run into little snags—it's part of the craft. Here's what I've learned from my own frogged piles and student questions.
Tentacles not curling? This is the big one. If they're sticking straight out, your chains were probably too tight. Frog just the tentacles (easy since they're last), loosen your grip on the chains, and work the return single crochets more relaxed. They should spiral naturally.
Another frequent issue: uneven tentacles. Some curly tight, others loose. Usually from inconsistent tension while working the chains. Fix? Count your 3 sc in each chain carefully—missing one makes it shorter. Or embrace the wonkiness—real octopuses aren't perfectly symmetrical anyway.
Head too pointy or flat? That's stuffing and decrease rounds. If pointy, you decreased too quickly—add an extra plain round before decreasing. Too flat? Not enough increases early on. Next time, double-check those stitch counts with your marker.
Safety eyes pulling out? Always add a dab of fabric glue or hot glue on the back washer. I've had one pop off during enthusiastic toddler hugs—lesson learned.
Yarn splitting like crazy? Switch brands or hook size. Some budget acrylics fray more. Red Heart holds up better than off-brands for me.
Bottom center gaping after tentacles? Use that long tail to cinch any holes closed, or work an extra slip stitch between tentacles for tighter coverage.
My most memorable fix: One octopus came out looking drunk because I accidentally skipped a decrease round. I frogged back to the mistake, fixed it, and now it's my favorite lopsided charmer. Mistakes often become character.
Take heart—these issues teach you tension, counting, and patience better than perfect makes ever could. You've got the tools to fix anything now.
Tips for Taking It Further
Ready to level up your octopus game? These tricks from years of tweaking will make yours stand out.
First, perfect suckers: After finishing a tentacle, surface crochet small circles or add bobbles along the underside. It adds realism and that satisfying texture pop. Giant versions especially benefit—those detailed arms look incredible.
Wire the tentacles for posability. Insert thin craft wire (or pipe cleaners for kid-safe) inside before stuffing the head. Bend them into playful poses. Just cover ends well to prevent poking.
Combine techniques: Add a granny square blanket body for a "blanket octopus" hybrid, or crochet a hat that fits perfectly for seasonal versions.
Market sellers, listen up: Multi-color tentacles (change color every few chains) or glow-in-the-dark yarn accents sell like hotcakes. In 2025, eco-friendly recycled cotton blends are trending hard for conscious buyers.
For preemie donations, master the exact size guidelines—many organizations still request tentacles no longer than 22cm stretched. Use cotton, embroider everything, and include a care tag.
Teaching tip: Once you're confident, host a crochet-along with friends. I did one virtually last year—watching everyone finish their first octopus together was pure magic.
Finally, document your makes. Photograph different angles, note yarn used, and keep a little journal. You'll see your progress and build a personal pattern library.
Your octopus journey is just beginning. Keep creating, keep sharing, keep that hook moving. The world needs more handmade joy, and you're perfectly equipped to provide it. Happy stitching, friends—I can't wait to hear about your variations!

The Author
I'm Joanna T. Grey. I've been designing crochet patterns for over a decade, and I focus on modern, wearable pieces with clear, tested instructions. Every pattern here is written so you actually understand the why behind each step—not just what to do. Even if you're new or experienced, you'll find practical guidance and designs that work.


