
Free Crochet Chicken Pattern: Easy Amigurumi Hen
Ready to whip up the sweetest little farmyard friend? This free crochet chicken pattern creates a plump, huggable amigurumi hen that's equal parts charming and quick to finish. Picture a soft, rounded body with tiny wings, a perky comb, and those dangly legs that make everyone smile.
Grab your hook and some worsted weight yarn—acrylic skeins are running around $4–$6 for 200+ yards these days—and you'll have a finished chicken in an evening or two. It's the kind of project that feels rewarding without overwhelming your schedule.
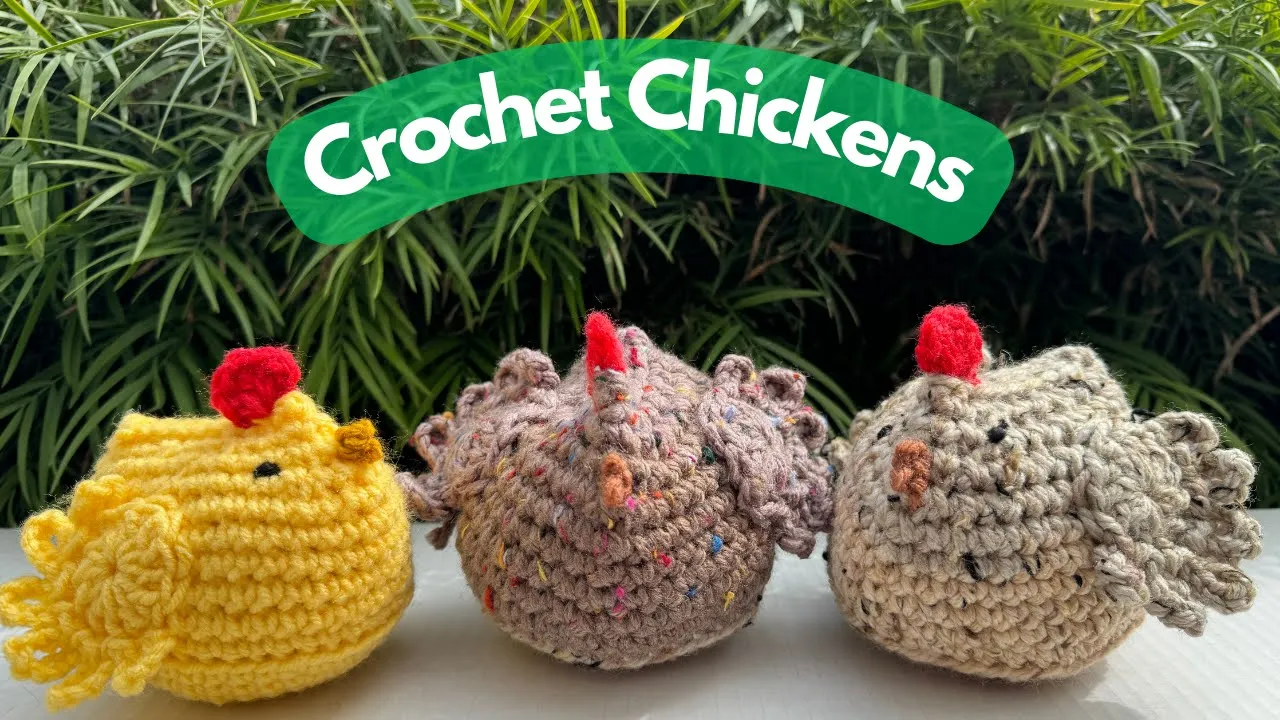
Why You'll Love This Free Crochet Chicken Pattern
Honestly, who can resist a chubby crochet chicken? These little guys bring instant joy, whether they're perched on your shelf or tucked into an Easter basket.
They're fantastic stash-busters too. One standard skein of acrylic worsted (think Red Heart Super Saver or similar, often on sale for under $5) covers the body, with scraps handling the comb, beak, and wings.
In 2025, no-sew or low-sew versions are everywhere on Ravelry, racking up hundreds of projects because makers love skipping the assembly fuss.
Plus, they're versatile—make a flock in pastel shades for spring decor or bold colors for year-round whimsy.
Last Easter, I crocheted a bright yellow one on a whim for a friend's kid. The squeals when she discovered it could "hide" tiny eggs inside? Pure magic. That surprised reaction reminded me why these patterns never go out of style.
Materials Needed
Gather just a handful of basics, and you're set to start clucking away on your chicken.
Essential supplies:
- Worsted weight (#4) acrylic yarn in main color (white, cream, or yellow) – about 150–200 yards
- Small amounts of red (for comb and wattle) and orange (for beak and legs)
- Polyester fiberfill stuffing (a 12-oz bag goes a long way for multiple projects)
- Pair of 9–12mm black safety eyes (or embroider if making for very young children)
- Yarn needle for weaving ends
- Stitch markers (a simple safety pin works in a pinch)
Optional but handy: small amount of pink yarn for cheeks, or felt scraps if you prefer sewn-on details.
These items keep the project budget-friendly—most makers spend under $15 total, even grabbing everything fresh.
Once, I forgot stuffing mid-project and improvised with scrap yarn bits. It worked, but proper polyfill gives that perfect plump squish.
Best Yarn Choices for Free Crochet Chicken Pattern
Acrylic worsted remains the top pick for amigurumi chickens in 2025, thanks to its durability, washability, and vast color selection.
Top recommendations:
- Red Heart Super Saver: Still America's bestseller, with 7-oz skeins (364 yards) running $3.77–$7 at major retailers like Walmart and Michaels. Excellent stitch definition and no splitting—ideal for beginners spotting those increases.
- Big Twist Value (Joann's house brand): Softer feel than Red Heart, 6-oz balls (380 yards) often on sale around $4–$5. Great for huggable toys that hold shape without stiffness.
- Caron One Pound: Perfect if building a flock—16-oz skein (812 yards) for about $9–$12, machine washable, and available in dozens of solids.
Avoid fuzzy chenille for this pattern unless going oversized; it hides stitches and makes counting tricky.
Ravelry projects this year show these brands dominating chicken makes, with hundreds logged under popular free patterns.
Bright yellow or soft cream shades photograph beautifully, but any stash scraps work wonders.
Gauge, Size Guide & Must-Have Tools
Gauge isn't super strict for amigurumi—tight enough to hide stuffing is the goal—but aim for about 5 single crochets per inch with a 4mm hook.
Finished size guide:
- With worsted yarn and 4mm (G/6) hook: approximately 8–9 inches tall (medium plump hen)
- Switch to 3.5mm hook: shrinks to 6–7 inches (cute tabletop size)
- Go up to 5mm or bulky yarn: easily 12+ inches for a jumbo cuddle buddy
Must-have tools:
- 4mm aluminum or ergonomic crochet hook (basic ones $2–$4; comfy soft-grip versions $6–$10)
- Scissors and tape measure
Ergonomic hooks save wrists on longer sessions—worth the small upgrade if tension runs tight.
Play with hook size to tweak dimensions; a half-size down firms everything up nicely.
Your chicken will turn out adorable no matter small variations—promise. Just keep stitches even, and enjoy the process.
Pattern Notes & Tips Before You Start
Work in continuous rounds unless specified—spiral style keeps things seamless for amigurumi.
Place a stitch marker in the first stitch of each round and move it up as you go. This simple habit saves endless recounting.
Stuff gradually: add polyfill every few rounds rather than all at once. It prevents lumps and gives even plumpness.
Safety first—if gifting to babies or toddlers under 3, skip safety eyes. Embroider features with yarn instead; those plastic backs can pose choking risks.
Use the invisible decrease for shaping (explained below) to avoid bumpy spots that show through.
Tight tension works best. If stuffing peeks out, drop half a hook size—no big deal.
Color changes happen on the last yarn over of the previous stitch. Carry unused yarn inside for minimal ends.
Count often, especially after increase rounds. A quick tally keeps everything symmetrical.
One tip that changed everything for me: weave in ends as you go on small parts like wings. Waiting until the end turns finishing into a chore.
Take breaks if your hands tire—amigurumi is meditative, not a race.
Abbreviations Explained
All terms follow standard US crochet conventions. Here's every one used in this free crochet chicken pattern, with clear explanations and quick tips.
ch – chain
Form the foundation. Yarn over, pull through loop on hook. Tip: Keep chains loose for legs to avoid tight curls.
sc – single crochet
Insert hook, yarn over, pull up loop, yarn over, pull through both loops. Basic building block—practice even height for smooth fabric.
inc – increase
Work 2 single crochets in the same stitch. Shapes curves like the body. Tip: Place both in the very top loops for neat growth.
invdec – invisible decrease
Insert hook into front loop only of next stitch, then front loop only of following stitch (3 loops on hook), yarn over, pull through first two loops, yarn over, pull through remaining two. Creates smooth shaping without gaps.
sl st – slip stitch
Insert hook, yarn over, pull through stitch and loop on hook. Great for joining or subtle details.
MR – magic ring
Wrap yarn around fingers, work stitches into adjustable loop, pull tail to close. Perfect center for heads and bodies—no hole left behind.
BLO – back loop only
Work into the back loop of the stitch, leaving front loop free. Creates ridges or easy attachment points.
FLO – front loop only
Opposite of BLO—hook goes under front loop only.
rnd(s) – round(s)
One full circle of stitches in spiral amigurumi.
st(s) – stitch(es)
The loops you work into.
Numbers in parentheses at round ends show total stitch count—check yours matches to stay on track.
Left-handed? Most techniques mirror easily; flip videos or photos mentally. You've absolutely got this—every expert started right where you are now.
Step-by-Step Free Crochet Chicken Pattern
Time to bring your chubby hen to life! This pattern uses simple shaping and minimal sewing—just the legs, wings, comb, beak, and wattle attach separately for that classic look.
Work in continuous rounds with your main color unless noted. Stuff as you go, and check those stitch counts in parentheses.
Finished size: about 8–9 inches tall with worsted yarn and 4mm hook.
Body & Head (worked as one piece)
Start at the bottom.
Rnd 1: MR, 6 sc (6)
Rnd 2: inc around (12)
Rnd 3: (sc, inc) x6 (18)
Rnd 4: (2 sc, inc) x6 (24)
Rnd 5: (3 sc, inc) x6 (30)
Rnd 6: (4 sc, inc) x6 (36)
Rnd 7: (5 sc, inc) x6 (42)
Rnd 8: (6 sc, inc) x6 (48)
Rnds 9–16: sc around (48) — that's 8 rounds even for the plump middle.
Rnd 17: (6 sc, invdec) x6 (42)
Rnd 18: sc around (42)
Rnd 19: (5 sc, invdec) x6 (36)
Rnd 20: sc around (36)
Pause here to attach safety eyes between Rnds 18 and 19, about 8 stitches apart. Start stuffing firmly.
Rnd 21: (4 sc, invdec) x6 (30)
Rnd 22: (3 sc, invdec) x6 (24)
Rnd 23: (2 sc, invdec) x6 (18)
Add more stuffing—get that neck nice and full.
Rnd 24: (sc, invdec) x6 (12)
Rnd 25: invdec x6 (6)
Fasten off, weave tail through front loops to close. Weave in end securely.
Wings (make 2)
With main color.
Rnd 1: MR, 6 sc (6)
Rnd 2: inc around (12)
Rnd 3: (sc, inc) x6 (18)
Rnd 4: (2 sc, inc) x6 (24)
Rnds 5–8: sc around (24)
Rnd 9: (2 sc, invdec) x6 (18)
Fold flat—no stuffing needed. Sl st across to close the opening (9 sl st). Fasten off, leave long tail for sewing.
Comb
With red yarn.
Ch 10.
In 2nd ch from hook: sl st, sc, hdc, dc, hdc, sc, sl st, sc, sl st.
Fasten off, leave long tail for sewing. This creates three little peaks—bend gently into shape.
Wattle (make 2)
With red yarn.
MR, 4 sc. Fasten off. Leave tail for sewing.
Beak
With orange yarn.
Rnd 1: MR, 6 sc (6)
Rnd 2: (sc, inc) x3 (9)
Rnd 3: sc around (9)
Fasten off, leave tail. Lightly stuff or leave flat.
Legs (make 2)
With orange yarn.
Ch 15.
In 2nd ch from hook and across: 3 sc in each ch (42 sc total—creates curly toes).
Fasten off, leave long tail. Make another identical.
Assembly and Finishing
Position everything symmetrically—lay your chicken flat to check balance.
Sew wings to sides around Rnds 14–18 of body, slightly curved downward.
Attach comb centered on top of head, just behind eyes.
Place beak between eyes, slightly below—stitch securely.
Sew wattles under beak, one on each side.
Pin legs to bottom front of body (around Rnds 5–8) so she stands nicely. Whipstitch in place; add a few extra stitches at the top for stability.
Optional: blush cheeks with pink yarn or makeup powder for extra cuteness.
Weave in all ends. Give her a gentle squeeze—she's ready to strut!
Your little hen turned out perfectly, didn't she? Snap a photo and share the joy—these always bring smiles.
Easy Variations & Custom Ideas
Your basic hen opens up endless possibilities—small tweaks create totally different personalities.
Switch colors for instant variety: soft pastels for spring chicks, bold brights (trending big in 2025 amigurumi), or even variegated yarn for speckled feathers.
Size adjustments stay simple—use a larger hook and bulky yarn for jumbo squish versions that finish 12+ inches tall, perfect cuddle buddies.
Make a rooster by enlarging the comb (add extra peaks) and crafting longer tail feathers with chains of varying lengths.
Add accessories for fun flair: tiny crocheted hats, scarves, or bonnets turn her into a holiday character or quirky gift.
Turn yours into an emotional support chicken—tuck a sweet note inside before closing the neck.
Build a whole family: minis with finer yarn and smaller hooks become keychains or ornaments.
Embroider flowers or hearts for extra charm. These personal touches make each one uniquely yours.
Common Troubleshooting and Fixes
Stitches looking gappy? Drop to a smaller hook—stuffing shouldn't peek through.
Body turning out lopsided? Double-check increases and decreases stay evenly spaced; count every round.
Chicken won't stand? Attach legs a bit forward on the bottom and add subtle weighting (rice in a small bag inside) for balance.
Neck too floppy? Stuff firmer there or work a few extra even rounds before decreasing.
Ends poking out after weaving? Thread them back through the stuffing a couple times before trimming.
Safety eyes scratching? Push the washer on firmly from inside, or switch to embroidered for peace of mind.
Tension uneven? Acrylic like Red Heart Super Saver (still around $4–$7 per skein in late 2025) forgives beginners beautifully.
One time my first chicken's head tilted comically—repositioned the eyes higher, and suddenly perfect posture.
These hiccups happen to everyone. Rip back if needed; the next attempt always looks better.
Next-Level Tips
Switch to velvet or chenille yarn for ultra-soft texture—2025's chunky versions fly off market tables.
Experiment with crazy eyes (larger mismatched safety eyes) for silly personality that kids adore.
Add surface crochet details like feather lines with slip stitches for realism without complexity.
Block lightly with steam for crisp wings and comb—hold iron above, never touch acrylic.
Photograph in natural light; these cuties shine on Etsy or Instagram with simple backgrounds.
For gifts, include care tags: machine wash gentle, dry low—practical and professional.
Join Ravelry groups sharing chicken projects; inspiration flows freely there.
Keep practicing invisible decreases—they elevate shaping dramatically.
Your flock will grow before you know it. Enjoy every cluck along the way!

The Author
I'm Joanna T. Grey. I've been designing crochet patterns for over a decade, and I focus on modern, wearable pieces with clear, tested instructions. Every pattern here is written so you actually understand the why behind each step—not just what to do. Even if you're new or experienced, you'll find practical guidance and designs that work.


