
Free Crochet Christmas Stocking Pattern
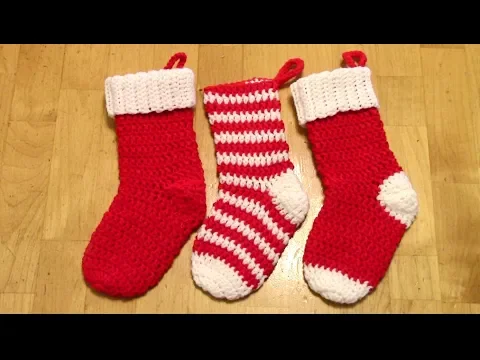
A classic crochet Christmas stocking brings warmth and handmade charm to any mantel. This free pattern delivers a timeless shape with a textured cuff, roomy body, and sturdy heel and toe — perfect for filling with treats or gifting as a keepsake. Worked mostly in single crochet for structure, plus simple texture stitches for visual interest, it finishes in about 10–15 hours depending on your pace.
Worsted-weight yarn keeps things affordable and sturdy; most makers use acrylic like Red Heart Super Saver (around $5–$7 per skein in early 2026 at major retailers) or similar #4 medium-weight options. One large skein in main color plus small amounts for contrast usually suffices. Recent Ravelry trends show textured and mosaic stockings gaining traction in 2025–2026, but this straightforward design stays beginner-accessible while looking polished.
The best part? You can customize colors for each family member or add appliques later for extra personality.
Why You'll Love This Crochet Christmas Stocking Pattern
This pattern strikes a sweet balance between classic holiday vibes and modern ease. The generous size (about 18 inches long) holds plenty without feeling floppy, and the turned heel gives a professional fit that stands up to years of use.
Texture comes from easy post stitches around the cuff — no fancy colorwork required unless you want to add it. Many crocheters on Ravelry rave about similar stockings becoming heirlooms because they wash well and hold shape.
Personal note: Years ago I made my first one in bright red and white for a mantel that felt too bare. The compliments rolled in, and now I swap colors each year just for fun. That small project sparked a tradition, and it might do the same for you.
Durability stands out too. Acrylic yarns resist moths and machine-wash easily — key for something displayed seasonally. Recent patterns like mosaic or chunky versions trend on Ravelry, but this one uses basic stitches so you finish faster and stress less.
Customization options keep it fresh. Sew on a simple heart or star applique, or change the cuff to ribbing. Check out our free butterfly crochet pattern easy for delicate add-ons or free crochet bat pattern easy applique tutorial if you lean whimsical.
Materials Needed
Gather these basics before starting — nothing fancy, just reliable staples that keep the project moving smoothly.
- Yarn: About 400–500 yards worsted-weight (#4 medium) acrylic in main color for the body; 100–150 yards in contrast for cuff, heel, and toe. One 7oz skein of main plus scraps or a partial skein for accents usually covers it.
- Hook: US H/8 (5 mm) for the main fabric; switch to G/6 (4 mm) if you want tighter stitches around the heel for better structure.
- Other tools: Yarn needle for weaving ends and seaming the cuff, stitch markers to track row starts (especially helpful during the heel turn), scissors, and a tape measure for checking length.
- Optional extras: Pom-pom maker or faux fur yarn for a fluffy cuff topper, ribbon for hanging loop.
Most of these live in any basic crochet kit. If you're short on markers, a scrap of contrasting yarn works in a pinch.
Best Yarn Choices for Crochet Christmas Stockings
Worsted acrylic reigns supreme here because it holds shape, washes easily, and comes in endless holiday colors. Red Heart Super Saver leads the pack — durable, affordable, and moth-resistant for seasonal storage.
Current pricing hovers around $5–$7 per 7oz skein at major retailers like Michaels or Walmart in early 2026; multipacks drop it to about $3–$4 per skein. Amazon often lists 3-packs for $11–$13, making it budget-friendly for multiple stockings.
Why beginner-friendly? It has good stitch definition without splitting badly, and minor tension wobbles even out in the dense single crochet fabric. Recent Ravelry projects favor acrylics for stockings that survive years of hanging and stuffing.
Other strong options include Lion Brand Vanna's Choice (similar price, softer hand) or Brava Worsted from WeCrochet for brighter shades. Avoid super-bulky unless you want a chunky look — it works but finishes quicker with less detail room.
For a plush feel on the cuff, try a touch of faux fur yarn looped in. Our yarn for cuddly toys guide covers soft, washable picks that pair nicely if you add appliques later.
If you're new to fiber choices, the best yarn for crochet beginners post breaks down why acrylics forgive mistakes so well. For scarves or wearables with similar yarn, see best yarn for scarves.
Cotton blends add drape but stretch more over time — stick to acrylic for crisp holiday structure.
Gauge, Size Guide & Must-Have Tools
Gauge matters for size and sturdiness: 16 single crochet and 18 rows = 4 inches in main body stitch with H hook and worsted yarn. Swatch a 5x5 inch square, measure, and adjust hook if needed — tighter for firmer fabric, looser if it's too stiff.
Finished size: About 18 inches long from cuff top to toe tip, 7–8 inches wide at the widest foot part. This fits standard mantel displays and holds generous goodies.
Want tweaks? Shorten the leg by 5–10 rounds for a mini stocking (great for gifts or tree ornaments); lengthen by adding rounds before the heel for taller versions. Widen the foot by increasing evenly across a round or two.
Tools that save headaches: Ergonomic hooks reduce hand strain during longer sessions — our best ergonomic crochet hooks set review highlights affordable winners. Best crochet hooks for beginners also covers starter options if you're upgrading.
Gauge troubleshooting tip: If your swatch is off, frog and retry rather than forcing it — consistent tension makes the heel turn smoother. One maker I know ripped back the leg twice before nailing the gauge, and the final stocking became her favorite family piece.
For blocking the finished stocking (optional but helps even stitches), check our crochet blocking tutorial for steam tips without fancy tools.
Hanging loop: Chain 30–40, slip stitch join, and sew to cuff back — sturdy and customizable.
All set? The pattern instructions follow, broken down clearly so you can crochet at your own pace. Grab that cup of tea — let's make something special.
Pattern Notes & Tips Before You Start
Read through the full pattern once before picking up your hook — it helps spot the heel section early so it doesn't surprise you.
Work in continuous rounds for the leg and foot unless noted; use a stitch marker to track the first stitch of each round. The cuff starts flat then joins, so pay close attention there.
Right side faces out throughout. Turn work only when instructed for the heel flap. Keep tension even, especially on decreases — loose decreases can make holes at the heel.
For color changes: Carry the unused yarn up the inside or cut and weave ends later. Join new colors at the end of a round for clean transitions.
Safety note: If gifting to small children, skip any small sewn-on embellishments or secure them tightly to prevent choking hazards. Acrylic yarn is generally safe and washable.
Beginner tip: Count stitches at the end of tricky rounds (heel turn especially). If off by one or two, frog back to the last correct count — better now than discovering later.
One personal troubleshooting story: On an early stocking, I skipped marking rounds and ended up with a twisted heel. Frogged the foot, added markers religiously after that, and now every stocking hangs straight.
Blocking optional but recommended for even stitches. Lightly steam or wet block after finishing; it smooths the texture and helps the stocking hold shape on the mantel.
Hang it by a sturdy loop — chain a long enough one to avoid stretching over time. Test the weight with a few oranges inside before filling with heavier gifts.
Customize length easily: Add or subtract rounds in the leg section before the heel for taller or shorter stockings. Foot section stays proportional.
If your gauge is slightly off, the stocking still works — just expect minor size differences. Many makers adjust on the fly and love the results.
For extra texture play, swap the cuff to our crochet moss stitch tutorial easy step stitches if you finish early and want practice.
Abbreviations Explained
All terms use standard US crochet terminology. Here's the full list with clear explanations and quick usage tips.
- ch – chain: Yarn over, pull through loop. Foundation for most projects; keep chains loose so stitches work easily into them.
- sl st – slip stitch: Insert hook, yarn over, pull through both loops. Joins rounds, creates hanging loops, or moves yarn without adding height.
- sc – single crochet: Insert hook, yarn over, pull up loop, yarn over, pull through both loops. Main stitch here — tight and sturdy.
- hdc – half double crochet: Yarn over, insert hook, yarn over, pull up loop, yarn over, pull through all three loops. Used sparingly for slight height.
- dc – double crochet: Yarn over, insert hook, yarn over, pull up loop, (yarn over, pull through two) twice. Adds drape if substituted, but stick to pattern for structure.
- fpdc – front post double crochet: Yarn over, insert hook around post from front to back to front, complete dc. Creates raised texture on cuff — work around post of stitch below.
- bpdc – back post double crochet: Similar to fpdc but insert from back to front to back. Alternates with fpdc for ribbed look.
- inc – increase: Work 2 stitches in same stitch (usually 2 sc). Shapes the foot and toe.
- dec – decrease: sc2tog (single crochet two together): Insert hook in first stitch, pull up loop, insert in next, pull up loop, yarn over, pull through all three. Reduces stitches smoothly.
- st(s) – stitch(es): Refers to individual or groups.
- sk – skip: Pass over a stitch without working into it.
- rep – repeat: Follow instructions again as directed.
- rnd(s) – round(s): Full circle of stitches.
- RS – right side: The front/outside face of work.
- WS – wrong side: Inside/back face.
Tips for success: When a pattern says "fpdc around next st," go around the post of the stitch from the previous round. Practice on a swatch if post stitches feel new.
For decreases: Always work sc2tog over two stitches to avoid gaps. Yarn under for tighter decreases if holes appear.
All set with these? The pattern starts with the cuff next — grab your materials and let's hook up something cozy. One stitch at a time turns into a stocking you'll treasure.
Step-by-Step Crochet Christmas Stocking Pattern
This pattern works from the cuff down to the toe in mostly continuous rounds of single crochet for a sturdy, beginner-friendly fabric. The cuff uses simple post stitches for texture, then transitions to plain single crochet for the leg, heel turn, foot, and toe. Use stitch markers liberally — especially around the heel — to avoid losing your place.
Start with the cuff in contrast color (CC), then switch to main color (MC) for the body. Change colors at the end of a round by completing the last stitch with the new color. All stitch counts are in bold at the end of each section.
Cuff
With CC and H hook (5 mm):
Ch 8.
Row 1: Sc in 2nd ch from hook and in each ch across. Turn. (7 sc)
Row 2: Ch 1, sc in back loop only (BLO) across. Turn. (7 sc)
Rows 3–40: Repeat Row 2. (Work in BLO for ribbed texture; this creates about 8–9 inches around when joined — adjust rows for larger/smaller cuff.)
Fold in half lengthwise, matching short ends. Sl st across through both layers to join into a tube. Do not fasten off — turn so RS faces out.
Rnd 1 (RS): Ch 1, work 40 sc evenly around top edge of cuff tube (about 1 sc per row end). Join with sl st to first sc. (40 sc)
Rnd 2: Ch 2 (counts as first dc here and throughout cuff), dc in next st, fpdc around next st, bpdc around next st; rep from around, dc in last st. Join with sl st to top of ch-2. (40 dc)
Rnd 3: Ch 2, fpdc around next fpdc, bpdc around next bpdc; rep from around, alternating post stitches to create ribbing. Join. (*40 dc)
Rnds 4–8: Repeat Rnd 3 for ribbed cuff texture. Fasten off CC after Rnd 8.
Tip: If post stitches feel awkward, practice on a small swatch first — they create that classic knit-like rib without complexity.
Leg
Switch to MC and continue from last st of cuff.
Rnd 1: Ch 1, sc in same st and in each st around. Place marker in first sc. Do not join — work in continuous rounds from here. (40 sc)
Rnds 2–30: Sc in each st around, moving marker up each round. (40 sc after each round)
After Rnd 30, the leg measures about 10–11 inches from cuff bottom — perfect for most mantels. Add/subtract 5 rounds for length tweaks.
Personal note: One stocking I made years back had uneven rounds here because I skipped the marker — it twisted slightly. Marking saved every project since.
Heel Flap
Work now in turned rows over half the stitches for the heel turn.
Row 1 (RS): Sc in next 20 sts (leave remaining 20 unworked for now). Turn. (20 sc)
Rows 2–12: Ch 1, sc across. Turn. (20 sc each row)
Heel Turn (short rows to shape curve):
Row 13: Ch 1, sc 11, sc2tog, sc 1. Turn. (13 sts — leave remaining unworked)
Row 14: Ch 1, skip first st, sc2tog, sc across to last 2 sts, sc2tog. Turn. (11 sts)
Row 15: Ch 1, sc2tog, sc across to last 2 sts, sc2tog. Turn. (9 sts)
Row 16: Ch 1, sc2tog, sc 5, sc2tog. Turn. (7 sts)
Row 17: Ch 1, sc2tog, sc 3, sc2tog. Turn. (5 sts)
Row 18: Ch 1, sc2tog, sc 1, sc2tog. Turn. (3 sts)
Row 19: Ch 1, sc2tog, sc in last st. Turn. (2 sts — heel turn complete)
Foot Gusset & Continuation
Pick up stitches around heel flap sides to rejoin the round.
Setup Rnd: Ch 1, sc in same st (top of heel turn), sc in next st of heel turn, then sc evenly 10 sts up side of heel flap (about 1 sc per row end), sc in 20 unworked sts from leg, sc evenly 10 sts down other side of heel flap, sc in remaining 2 sts of heel turn. Place marker — now working continuous rounds again. (44 sc)
Decrease Rnd 1: Sc around to 2 sts before marker, sc2tog, move marker, sc2tog, sc to end. (42 sc)
Decrease Rnd 2: Repeat Decrease Rnd 1. (40 sc)
Rnds 3–20: Sc in each st around. (40 sc)
Foot section now about 7–8 inches long — adjust by adding rounds before toe decreases.
Troubleshooting: If gusset feels loose, use smaller hook for these pick-up rounds next time — tightens without holes.
Toe
Rnd 1: Sc 8, sc2tog; rep from around. (36 sc)
Rnd 2: Sc around. (36 sc)
Rnd 3: Sc 7, sc2tog; rep from around. (32 sc)
Rnd 4: Sc around. (32 sc)
Rnd 5: Sc 6, sc2tog; rep from around. (28 sc)
Rnd 6: Sc around. (28 sc)
Rnd 7: Sc 5, sc2tog; rep from around. (24 sc)
Rnd 8: Sc around. (24 sc)
Rnd 9: Sc 4, sc2tog; rep from around. (20 sc)
Rnd 10: Sc 3, sc2tog; rep from around. (16 sc)
Rnd 11: Sc 2, sc2tog; rep from around. (12 sc)
Rnd 12: Sc 1, sc2tog; rep from around. (8 sc)
Rnd 13: Sc2tog around. (4 sc)
Fasten off, leaving 12-inch tail. Thread tail through remaining sts, pull tight to close. Weave in end securely inside.
Assembly and Finishing
Turn stocking RS out. Weave in all ends — use yarn needle to bury them along inside seams.
Hanging loop: With MC, ch 40 (or desired length), sl st in 2nd ch from hook and each ch across for sturdy cord. Sew ends to inside back of cuff, centered.
Optional cuff topper: Add faux fur yarn or pom-poms for fluff — loop through post stitches.
Blocking: Lightly steam or wet block to even stitches and help hold shape — pin flat, mist, let dry. Our crochet blocking tutorial has simple steam tips without tools.
For personalization, sew on appliques like our free butterfly crochet pattern easy for whimsy or free crochet bat pattern easy applique tutorial for spooky holiday twists. Yarn choices align with best acrylic yarn for crochet for durability.
Weave in that last end, hang it proudly — you've just made a piece that'll bring smiles year after year. One round at a time really does build something beautiful. If tension varies slightly, embrace the handmade charm. You've got this!
Easy Variations & Custom Ideas
This base pattern adapts easily — tweak colors, textures, or add-ons without rewriting the whole thing. Most changes happen in the cuff, leg, or finishing.
Swap the cuff ribbing for a simpler scallop edge: After Rnd 1 of cuff, work 5 dc in next st, sk 2 sts, sc in next; rep from around for a wavy holiday flair. Keeps it beginner-doable.
Go monochrome for a modern minimalist look — use one shade throughout, or add subtle stripes by changing colors every 5–10 rounds in the leg. Recent 2025–2026 trends on Ravelry lean toward neutral palettes with pops of metallics.
For a chunky version, switch to super-bulky yarn (#6) and a larger hook (J/6 mm or K/6.5 mm) — reduce rounds by about 30% to maintain size. Finishes quicker, great for last-minute gifts.
Mini stockings make sweet ornaments or gift card holders: Halve the leg rounds (to about 15), keep foot/toe proportional. Use sport-weight yarn for delicate detail.
Personal twist: One year I added a fair isle-inspired band mid-leg using simple color changes every other round — no carrying yarn needed if you cut and weave. Turned a plain stocking into a family favorite.
Add appliques for personality — a small heart for love, star for sparkle. Our free butterfly crochet pattern easy works perfectly sewn to the cuff or foot; the free crochet bat pattern easy applique tutorial adds fun for non-traditional holidays.
For whimsy, attach a tiny amigurumi like our adorable crochet frog free pattern easy dangling from the cuff loop.
Color combos trending now: Classic red/white, forest green with gold accents, or pastel rainbow for kids. Use variegated yarn in the leg for built-in interest without extra work.
If you love texture, experiment with the crochet moss stitch tutorial easy step in the leg section instead of plain sc — adds subtle bumps that catch light beautifully.
Personalize names or initials with surface slip stitch embroidery after blocking — simple and forgiving.
Common Troubleshooting and Fixes
Heel turn gaps or holes? These happen from loose decreases or skipped stitches. Tighten your yarn on sc2tog rounds, or add an extra sc in problem spots when picking up gusset stitches next time.
Stocking twists or curls? Almost always from un-marked continuous rounds — the heel flap shifts your marker. Frog back to the leg end, re-mark carefully, and proceed. Markers are your best friend here.
Cuff too loose or tight? Measure around your fist before joining rows — aim for 8–9 inches unstretched. If off, add/subtract 2–4 foundation chains and adjust even sc count in Rnd 1.
Toe closes bumpy? The final decreases pull tight — if it puckers, leave a longer tail, weave through twice, and cinch slowly while shaping with your fingers.
Tension inconsistent (some rounds tighter)? Happens to everyone early on. Pause, stretch the work gently, and match your starting tension. Our related how to fix crochet gauge issues guide has more on evening it out.
Yarn splitting? Switch to a blunt yarn needle for weaving ends, and use acrylics like Red Heart that resist splitting. If using cotton, go slower on post stitches.
Heel flap too short/long? Try on as you go — slip foot in after gusset decreases. Add 2–3 rows to flap for deeper heel if needed.
Ends poking out? Weave them in zig-zag along inside color changes — hides better than straight lines.
If the whole thing feels floppy, your hook might be too large — drop down half a size and re-swatch. Dense fabric holds shape best for hanging.
One fix that saved a project: I once had uneven post stitches in the cuff — frogged just those rounds, re-did with consistent yarn over direction, and it evened perfectly.
Next-Level Tips
Block aggressively for pro finish — wet the stocking, pin to shape on a towel (toe pointed, heel curved), and let dry flat. Steam helps set post stitches without full wetting.
Add a lining for extra sturdiness: Sew in a simple fabric pouch (felt or cotton) after assembly — prevents stretching from heavy gifts. Hand-stitch along inside cuff.
For durability, reinforce the hanging loop with a double chain or add a metal D-ring sewn securely.
Experiment with stitch swaps: Replace some leg sc with hdc for subtle height variation, or add fpdc columns for vertical texture.
Track yarn usage next time — weigh scraps to plan multi-color versions efficiently. Most makers finish one stocking per 400–450 yards worsted.
Join Ravelry project notes for this pattern style — search "crochet christmas stocking" there for real-time tweaks from others in 2026.
Store flat or rolled — avoid hanging year-round to prevent point stretching.
Gift it with care instructions: Machine wash cold, lay flat to dry — acrylic holds up beautifully.
Build a set: Make coordinating minis using leftover yarn — tree ornaments double as gift toppers.
You've nailed the basics — now play. Small changes turn this into your signature holiday piece. One variation at a time keeps the joy going.
You Might Also Love These Patterns
- Free crochet bat pattern easy applique tutorial — Add spooky charm or whimsical flair to your stocking cuff.
- Free butterfly crochet pattern easy — Delicate wings perfect for sewing onto the body or as a hanging accent.
- Adorable crochet frog free pattern easy — Tiny amigurumi friend to dangle from the loop for playful personalization.
- Crochet moss stitch tutorial easy step — Try this subtle texture swap in the leg for next-level interest.
- Best yarn for crochet beginners — Guidance on forgiving fibers if you're planning more projects.
- Crochet blocking tutorial — Step-by-step to make your stocking look polished and even.
- Easy free beginner crochet scarf — Use similar worsted yarn skills for a quick matching holiday set.

The Author
I'm Joanna T. Grey. I've been designing crochet patterns for over a decade, and I focus on modern, wearable pieces with clear, tested instructions. Every pattern here is written so you actually understand the why behind each step—not just what to do. Even if you're new or experienced, you'll find practical guidance and designs that work.


