
Easy Layered Crochet Flower Pattern: Free Tutorial
Crochet flowers bring a pop of color to everything from hats to blankets, and this simple layered design works up in minutes with scraps. Grab your hook and let's make a few – they're addictive in the best way.
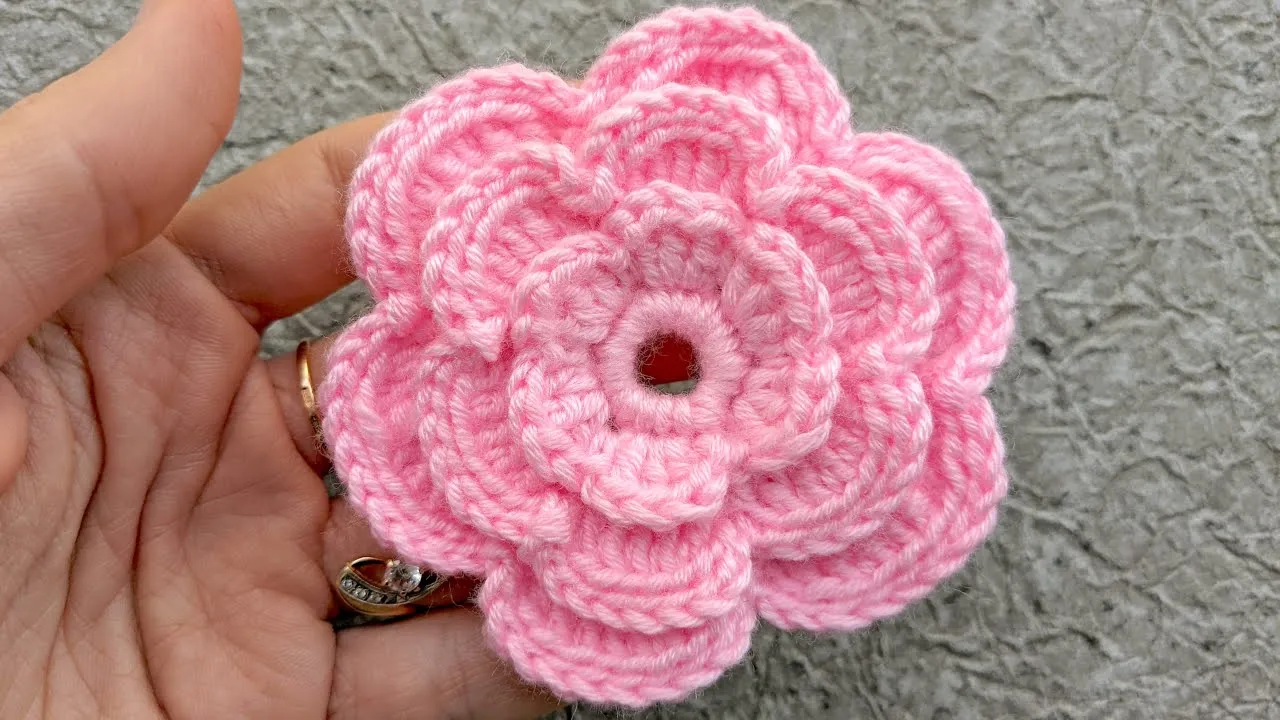
Why You'll Love This Crochet Flower Pattern
Quick projects like these keep the joy in crocheting. One flower takes less than 15 minutes once you're in the rhythm.
They're perfect stash-busters. Leftover bits of DK or worsted yarn shine here, and current prices make experimenting easy – a 100g skein of Paintbox Cotton DK runs about $5-7 on LoveCrafts, while acrylic options like Hobbii Amigo stay under $3 per ball.
Versatility stands out. Sew them onto beanies, bags, or garlands. In 2025, floral appliques top trends, with search interest for "crochet flower patterns" peaking at 87 in February on Google data, tied to Valentine's and wedding seasons.
Layer different sizes for dimension or keep them flat for subtle embellishment. Colors mix endlessly – try sage green with terracotta for that earthy vibe trending this year.
Once, a skein of bright pink scraps turned into a whole bouquet that cheered up a plain tote bag during a dreary week. Little touches like that make handmade feel special.
Materials Needed
Gather just a handful of basics to start blooming right away. Most makers already own these staples.
Essential items:
- DK or worsted weight yarn in your chosen colors (scraps work beautifully)
- Crochet hook sized 4mm (G/6) or 3.5mm (E/4) depending on yarn
- Yarn needle for weaving ends and sewing layers
- Sharp scissors
- Optional: stitch markers, blocking mat, or pins for shaping
Flowers forgive minor tool swaps. Use what feels comfortable in hand.
One busy evening last month, digging through drawers yielded an old pair of embroidery scissors and a blunt needle – still turned out a dozen cheerful blooms for gift tags.
Budget-friendly setups shine here. Total cost stays under $20 if buying new, often much less with stash yarn.
These small projects teach tool preferences quickly without big investment.
Best Yarn Choices for Crochet Flower Pattern
Cotton delivers crisp petals that hold shape perfectly, while acrylic offers softness and endless colors on a budget.
Top beginner-friendly picks in late 2025:
- Stylecraft Special DK (100% acrylic): Around £2-3 per 100g ball at Wool Warehouse or LoveCrafts. Machine-washable, huge shade range, hides tension variations beautifully.
- Paintbox Yarns Cotton DK: Often $6-8 for 50g on LoveCrafts, with value packs dropping costs further. Mercerized sheen gives professional polish; great stitch definition for layered flowers.
- Hobbii Rainbow Cotton 8/4 or 8/8: Affordable 100% cotton, frequently bundled in color packs. Smooth, durable, and transitioning to GOTS-certified organic options.
Acrylic suits quick gifts or kid items – no special care needed. Cotton excels for brooches or home decor that might face sunlight.
Mix weights playfully: DK centers with worsted petals add dimension.
Beginners thrive with these because splitting stays minimal and colors stay vibrant wash after wash.
Swatching a few rounds reveals favorites fast – no wrong choices here.
Gauge, Size Guide & Must-Have Tools
Gauge matters less for standalone flowers than wearables, but consistency keeps petals even.
With DK yarn and 4mm hook, expect finished flowers around 3-4 inches across. Switch to 3.5mm for tighter 2.5-inch blooms; go up to 5mm for airy 5-inch versions.
Quick size tweaks:
- Fingering yarn + 3mm hook → dainty 1-2 inch accents
- Worsted yarn + 4.5mm hook → bold 4-5 inch statement pieces
Test one flower first – adjust hook size until petals lie flat without curling.
Must-have tools beyond basics:
- Clover Amour hooks (around $8-10 each) for ergonomic comfort during marathon sessions
- Rust-proof pins and foam mat for steam blocking if petals need crisp edges
Tension evens out with practice. Loose crocheters drop a hook size; tight ones go up.
A simple swatch of 10 dc across reveals everything in minutes.
These tiny projects let you experiment freely – change a hook, gain a whole new look.
Pattern Notes & Tips Before You Start
Take a deep breath – this pattern stays straightforward from start to finish. Worked in joined rounds with basic stitches, it builds petal layers naturally.
US crochet terms apply throughout. Magic ring starts the center for a tidy hole-free beginning; alternatives appear below if preferred.
Each round joins with a slip stitch. Count stitches carefully at round ends – off-counts shift petals oddly.
Handy tips for smooth sailing:
- Keep tension even but relaxed; tight stitches make pulling through tricky.
- Work over tail ends in first round to minimize weaving later.
- Change colors between rounds for layered looks – fasten off old, join new in join stitch.
- Block finished flowers lightly with steam for crisp petals, especially cotton versions.
Safety stays simple: sharp scissors away from little hands, no small parts once complete.
Magic ring might feel fiddly first try. Practice on scrap yarn – it tightens beautifully once mastered.
Alternative start: Chain 4, join with sl st to form ring, then work Round 1 into ring.
Petals ruffle slightly – embrace it for organic charm. Steam blocking flattens if desired.
One rainy afternoon, wrestling a stubborn magic ring turned into victory after three tries. Those "aha" moments make every flower sweeter.
Abbreviations Explained
Clear definitions keep everyone on track. Only a handful appear here – all beginner-friendly.
ch – chain: Yarn over, pull through loop on hook. Forms foundation and spaces.
sl st – slip stitch: Insert hook, yarn over, pull through stitch and loop on hook. Joins rounds invisibly or moves yarn without height.
sc – single crochet: Insert hook, yarn over pull up loop, yarn over pull through both loops. Short, dense stitch for centers.
dc – double crochet: Yarn over, insert hook, yarn over pull up loop, (yarn over pull through two loops) twice. Tall stitch creating petal height and drape.
() – parentheses: Work instructions inside as many times as specified.
* – asterisk: Repeat instructions between asterisks across round.
mr – magic ring: Loop yarn around fingers, work stitches into adjustable loop, pull tail to close.
Tip: Hold working yarn gently while pulling tail – prevents over-tightening.
These stitches combine simply here. Reference photos anytime confusion hits – visual cues clarify fast.
Step-by-Step Crochet Flower Pattern
This layered flower builds in three quick parts: a small tight center, a middle petal layer, and a larger outer layer. Make all three separately, then stack and secure. Change colors between layers for contrast or keep them tonal – both look lovely.
Work in joined rounds throughout. Stitch counts appear in parentheses at each round's end. Double-check as you go; it prevents wonky petals later.
Grab your hook and yarn. Here we go.
Small Center Layer
Round 1: Start with magic ring (mr). Ch 1 (does not count as stitch), work 10 sc into ring. Pull tail gently to close. Join with sl st to first sc. (10 sc)
Round 2: Ch 2 (counts as first dc here and throughout), dc in same stitch, 2 dc in each remaining sc around. Join with sl st to top of beginning ch-2. (20 dc) Fasten off, weave in ends.
This creates a slightly domed center – perfect base for petals.
Middle Petal Layer
Round 1: Magic ring, ch 1, 12 sc into ring. Pull closed, join with sl st. (12 sc)
Round 2: Ch 1, sc in same stitch, ch 5, skip 1 sc, sc in next sc; repeat from * around, ending with ch 5, join with sl st to first sc. (6 ch-5 loops)
Round 3: Sl st into first ch-5 loop, ch 2 (counts as dc), work 7 dc in same loop (8 dc total including ch-2). Work 8 dc in each remaining ch-5 loop around. Join to top of ch-2. (48 dc – 6 petals of 8 dc each) Fasten off, leaving long tail for sewing if desired.
Petals puff naturally here. Tug gently to even them out.
Large Outer Petal Layer
Round 1: Magic ring, ch 1, 10 sc into ring. Pull closed, join. (10 sc)
Round 2: Ch 1, sc in same, ch 6, skip 1 sc, sc in next; repeat from * around, ending ch 6, join. (5 ch-6 loops)
Round 3: Sl st into first ch-6 loop, ch 2, work 9 dc in same loop (10 dc total). Work 10 dc in each remaining loop. Join. (50 dc – 5 petals of 10 dc each) Fasten off, leaving extra-long tail for assembly.
Larger loops give flowing outer petals that frame the middle layer beautifully.
Assembly and Finishing
Stack layers: large outer at bottom, middle on top, small center on very top. Offset petals slightly for fuller look – rotate each layer about 30-45 degrees.
Thread yarn needle with tail from middle or outer layer. Sew through all centers a few times to secure. Knot discreetly on back.
Add button, bead, or French knot in very center for polish if desired.
Steam block gently if petals curl. Pin flat, hover iron with steam – shapes hold perfectly.
Last month, whipped up a batch in holiday reds and whites for gift toppers. They transformed plain kraft paper into something special. Your flowers will do the same.
All done – admire those blooms! Variations and project ideas next.
Easy Variations & Custom Ideas
Switch things up easily – this pattern adapts beautifully. Start with color play for instant variety.
Simple tweaks for fresh looks:
- Make only two layers (center + middle) for dainty accents around 2.5 inches.
- Add a fourth layer: repeat outer petal round with ch-7 loops and 12 dc per petal for oversized blooms.
- Mix yarns mid-layer – cotton centers with acrylic petals add subtle texture contrast.
Trending in late 2025: multi-tone flowers mimicking Japanese roses or sunflowers, seen in Etsy bestsellers and Ravelry hot lists. Earthy palettes like mocha with sage pops dominate home decor appliques.
Attach them everywhere. Sew onto beanies for winter warmth, headbands for quick gifts, or tote bags for everyday cheer. Brooches need only a pin backing – affordable packs run $4-6 on Amazon right now.
String several into garlands for party decor. Last spring, stitched a rainbow set onto plain curtains – transformed the room on a lazy weekend.
Embellish further: tiny beads in centers or embroidered veins on petals elevate them to heirloom status.
Common Troubleshooting and Fixes
Petals curling tops the list – happens often with tight tension or acrylic yarn.
Quick fixes:
- Go up a hook size for petal rounds only (e.g., 4.5mm instead of 4mm) to loosen stitches.
- Steam block: pin flat on foam mat, hover steaming iron above – shapes set in seconds.
- Wet block cotton versions: mist lightly, pin, air dry.
Uneven layers? Offset stacking more dramatically next time – rotates naturally.
Centers puckering means magic ring pulled too tight. Loosen gently or switch to ch-4 ring start.
Stitch counts off shift petals. Recount each round end – small flowers reveal mistakes fast.
One batch last summer curled stubbornly until steam – flattened perfectly for market display.
Most issues resolve with blocking or minor tension tweaks – forgiving project overall.
Next-Level Tips
Ready for more dimension? Try puff stitches in petals for textured 3D effect trending now.
Irish crochet influences shine: add padded cord outlines around petals for raised vintage look – tutorials abound on YouTube.
Cluster treble crochets together for ruffled edges mimicking real blooms.
Wire centers lightly (floral wire under $5 at craft stores) for posable stems in bouquets.
Combine with granny squares – floral centers remain huge on Ravelry.
Experiment freely. One evening played with triple layers and popcorn stitches – created dramatic roses instantly.
These tips open endless doors. Your flowers just got even more addictive.

The Author
I'm Joanna T. Grey. I've been designing crochet patterns for over a decade, and I focus on modern, wearable pieces with clear, tested instructions. Every pattern here is written so you actually understand the why behind each step—not just what to do. Even if you're new or experienced, you'll find practical guidance and designs that work.


