
Free Cozy Crochet Cardigan Pattern
I’m so excited to share this free crochet cardigan pattern with you today.
I designed this one specifically as a quick-win project that eats through your yarn stash like nobody’s business. It’s oversized, cozy, and works up faster than you’d expect.
Let’s grab our hooks and make something we’ll actually wear all winter.
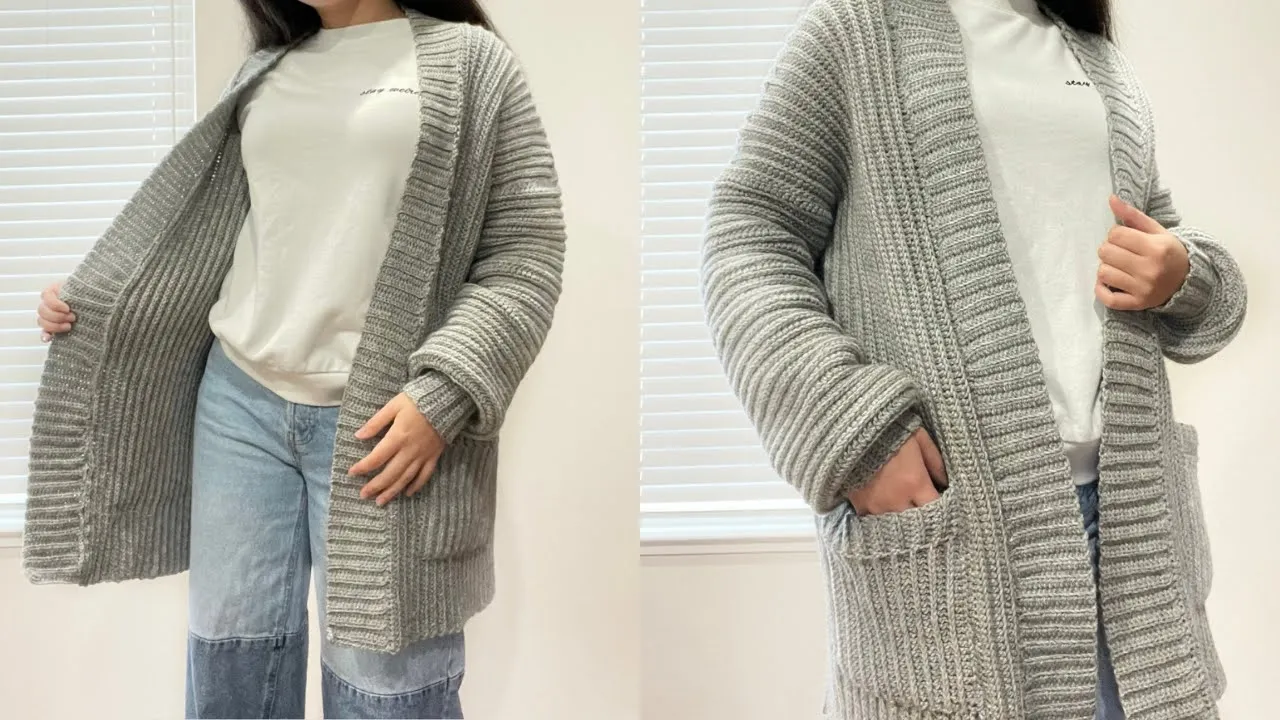
This crochet cardigan is a relaxed, open-front style worked in one piece from the top down using simple rectangles and minimal seaming.
I used worsted-weight yarn and a roomy fit that layers perfectly over tees or dresses.
The pattern includes sizes from XS to 5XL, and the whole thing relies on basic stitches you probably already know.
Where Did the Inspiration Come From?
I pulled the idea straight from my own closet last fall.
I kept reaching for the same store-bought cardigan – soft, slouchy, and long enough to cover everything.
I thought, why not crochet my own version that uses up the piles of leftover worsted yarn taking over my shelves? That’s exactly what this pattern does. It turned into the cardigan I now throw on every single day.
Why Is This Cardigan a Classic?
This style has stayed popular for years because it flatters every body type and never goes out of fashion. The open front and longer length give it that effortless look people love.
Crocheters keep making versions of it decade after decade – it’s a true wardrobe staple that works in any color or yarn you have on hand.
Is This Cardigan Hard to Crochet?
No, it’s genuinely easy.
I wrote the pattern for confident beginners and up. You only need single crochet, half double crochet, and double crochet – nothing fancy.
We work top-down with simple increases for the yoke, then straight rectangles for the body and sleeves.
If you can crochet a granny square, you can make this cardigan. Mistakes? They hide beautifully in the texture. Don’t worry about perfection – just keep going and it will turn out wonderful.
Materials You'll Need for This Crochet Cardigan
I always start with the basics because even if you're new, having the right stuff makes everything smoother.
For this cardigan, grab about 800-1500 yards of worsted-weight yarn depending on your size – I love using acrylic or wool blends from my stash.
You'll need a size H/8 (5mm) crochet hook, or whatever gets you gauge. Don't forget stitch markers, scissors, and a yarn needle for seaming.
If you're a total newbie, worsted yarn is medium thickness, easy to see your stitches with.
Gauge and Sizing Info
Gauge is just how many stitches fit in a certain space – it ensures your cardigan fits right.
For this pattern, crochet a 4-inch square in double crochet: it should be 13 stitches and 7 rows.
If yours is different, switch hook sizes.
Sizes are XS (32-34" bust), S (36-38"), M (40-42"), L (44-46"), XL (48-50"), 2XL (52-54"), 3XL (56-58"), 4XL (60-62"), 5XL (64-66").
I'll note stitch counts for each size in parentheses like this: XS(S, M, L, XL, 2XL, 3XL, 4XL, 5XL).
How to Hold Your Hook and Yarn – For Absolute Beginners
If this is your first project, hold the hook like a pencil in your dominant hand – thumb and index finger gripping it, middle finger supporting.
Yarn goes over your non-dominant index finger, under middle and ring, pinky holds it taut. Practice chaining 10 stitches: make a slip knot (loop yarn, pull tail through), hook in loop, yarn over, pull through – repeat.
Tension comes with practice; if it's too tight, loosen your grip. Mistakes? Frog it (rip it out) and start over – no big deal, we've all been there.
Starting the Yoke – The Top-Down Foundation
We begin with the yoke, which shapes the neck and shoulders.
Chain 50(54, 58, 62, 66, 70, 74, 78, 82) – that's your starting chain. This creates a foundation for the raglan increases.
Row 1 sets up the sections: front, sleeve, back, sleeve, front.
Row 1 of the Yoke
Row 1: Dc in the 4th ch from hook (counts as first dc and ch-1 space? No, just starting dc).
Dc in next 6(7, 8, 9, 10, 11, 12, 13, 14) ch – that's right front. (Dc, ch 1, dc) in next ch – raglan corner.
Dc in next 8(9, 10, 11, 12, 13, 14, 15, 16) ch – first sleeve. (Dc, ch 1, dc) in next ch – corner.
Dc in next 14(15, 16, 17, 18, 19, 20, 21, 22) ch – back. (Dc, ch 1, dc) in next ch – corner. Dc in next 8(9, 10, 11, 12, 13, 14, 15, 16) ch – second sleeve. (Dc, ch 1, dc) in next ch – corner.
Dc in last 7(8, 9, 10, 11, 12, 13, 14, 15) ch – left front. Turn. Stitch count: 47(51, 55, 59, 63, 67, 71, 75, 79) dc plus 4 ch-1 spaces.
Increasing Rows in the Yoke
Rows 2-10(11, 12, 13, 14, 15, 16, 17, 18): Ch 3 (counts as dc), dc in each dc to ch-1 space. (Dc, ch 1, dc) in ch-1 space.
Repeat around: dc across sleeve to next space, increase in space, dc across back, increase, dc across sleeve, increase, dc across front to end.
Turn.
Each row adds 8 dc (2 per corner). After last increase row, yoke has: fronts 17(19, 21, 23, 25, 27, 29, 31, 33) dc each, sleeves 18(20, 22, 24, 26, 28, 30, 32, 34) dc each, back 34(37, 40, 43, 46, 49, 52, 55, 58) dc, plus 4 ch-1 spaces. I double-checked: yes, increases are even.
Dividing for Body and Sleeves
Now we separate the sleeves – super satisfying step. Next row: Ch 3, dc across right front to ch-1 space.
Dc in space, ch 4(5, 6, 7, 8, 9, 10, 11, 12) for underarm, skip sleeve sts, dc in next ch-1 space.
Dc across back to next space. Dc in space, ch 4(5, 6, 7, 8, 9, 10, 11, 12), skip second sleeve, dc in last space. Dc across left front.
Turn.
Body now has 71(79, 87, 95, 103, 111, 119, 127, 135) sts including underarm chains.
Working the Body
Body rows are straight dc – easy peasy. Rows 1-20(22, 24, 26, 28, 30, 32, 34, 36): Ch 3, dc in each st across.
Turn.
Keep stitch count at 71(79, 87, 95, 103, 111, 119, 127, 135).
If you drop one, count at row ends – add or frog as needed. This makes the body about 15-20 inches long; adjust rows for your preference.
Adding the Bottom Border
For a neat edge, switch to hdc. Rows 1-3: Ch 2 (counts as hdc), hdc in each st across.
Turn.
Then, one row of sc: Ch 1, sc across. Fasten off. This ribbing adds stretch without curling.
Making the Sleeves
Attach yarn at underarm center.
Round 1: Ch 3, dc around sleeve opening: dc in skipped sleeve sts 18(20, 22, 24, 26, 28, 30, 32, 34), then dc evenly in underarm ch 4(5, 6, 7, 8, 9, 10, 11, 12). Sl st to join. Total: 22(25, 28, 31, 34, 37, 40, 43, 46) dc.
Work in rounds now – no turning.
Sleeve Rounds
Rounds 2-30(32, 34, 36, 38, 40, 42, 44, 46): Ch 3, dc in each dc around. Sl st to join.
For taper: Every 5 rounds, dc2tog twice evenly – but only if you want fitted sleeves; skip for slouchy.
Final count before cuff: aim for 18-22 sts, but count yours. Mine always varies a bit, and it's fine.
Sleeve Cuffs
Rounds 1-3: Ch 2, hdc around. Sl st. Then sc round: Ch 1, sc around. Sl st. Fasten off.
Repeat for second sleeve.
If stitches don't match exactly, fudge it with an extra inc or dec – no one notices in wear.
Seaming and Finishing Touches
Minimal seaming: just underarms if needed, but since we chained them, often none.
Weave in ends with yarn needle: thread tail, weave back and forth through sts.
Block if you want: wet cardigan, pin to shape, dry flat.
Try it on – if it's wonky, remember, yarn relaxes with wear.
You did it! Wear it proudly, friend.
Recommended Yarn for This Crochet Cardigan
I always recommend Red Heart Super Saver worsted-weight acrylic yarn for this cardigan, especially if you're just starting out. It's my absolute go-to for beginner garments like this one.
Here's why Red Heart Super Saver is perfect for beginners:
- It's 100% acrylic, so it's super affordable – you can grab plenty without breaking the bank.
- The yarn is smooth and plied tightly, which means your stitches show up clearly and it's forgiving if you split a stitch (easy to fix without frogging everything).
- It's machine washable and dryable, so your finished cardigan holds up to real life – no special care needed.
- No dye lots on solids, meaning every skein matches perfectly if you need more mid-project.
- It comes in over 100 colors, including soft neutrals and bright pops, so you can match your stash or mood.
- The fabric it creates has good structure without being too stiff, and it softens up nicely after a wash.
Many crocheters use it successfully for cardigans – it gives that cozy, durable feel we want in a everyday piece.
Yarn Amounts You'll Need
Buy these approximate yards based on your size (Red Heart Super Saver solids are 364 yards per 7oz skein):
- XS-S: 1000-1200 yards (3-4 skeins)
- M-L: 1200-1400 yards (4-5 skeins)
- XL-2XL: 1400-1600 yards (5 skeins)
- 3XL-5XL: 1600-2000 yards (5-6 skeins)
Grab an extra skein just in case – better safe than running short!
Gauge – Why It Matters and How to Get It Right
Gauge is simply how many stitches and rows fit in a 4x4 inch square. For this pattern, aim for 13 double crochet stitches and 7 rows in 4 inches using a 5mm (H/8) hook.
Why bother? It ensures your cardigan fits like mine does – not too tight or baggy. Crochet a swatch: chain 20, dc in rows until square, measure in the middle.
If too many stitches (fabric tight), go up a hook size. Too few (loose), go down. Beginners, don't skip this – it saves heartbreak later.
Sizing Tips for the Perfect Fit
This pattern fits bust sizes 32-66 inches with positive ease (roomy on purpose). Measure your actual bust and choose the size 4-6 inches larger for that slouchy vibe.
The top-down construction makes trying on easy – work the yoke, slip it over your head, and check shoulder fit before dividing for sleeves.
Add or remove body rows for length. It's customizable, so tweak as you go.
Essential Tools You'll Need
Gather these before starting:
- 5mm (H/8) crochet hook – aluminum or ergonomic, whatever feels comfy in your hand.
- Stitch markers – lockable ones to mark those raglan increases.
- Yarn needle – big eye for weaving ends.
- Scissors and measuring tape.
If your hands cramp, try a cushy grip hook – makes longer sessions way better.
A Few More Beginner-Friendly Tips
Choose a light or medium color yarn first – dark shades hide stitches and make counting harder. Solid colors help you see the texture.
If a stitch looks off, don't panic – keep going. This pattern's simple repeats hide little oopsies beautifully.
You’ve got this, friend – pick up that yarn and let's make your new favorite cardigan together!
Pattern Notes: What Beginners Need to Know
This pattern is written in standard US crochet terms with sizes listed as XS(S, M, L, XL, 2XL, 3XL, 4XL, 5XL). Stitch counts appear in parentheses like this after each row or round.
The cardigan works top-down in one piece, starting with the yoke. Raglan increases shape the shoulders, then we divide for sleeves and body. Sleeves work in joined rounds.
Multiple means the body stitch count after dividing is a multiple of something – here, it's any number since we use only double crochet with no repeating pattern stitch. You can easily add or subtract rows for length without issues.
Turning chains count as a stitch: ch-3 for dc, ch-2 for hdc, ch-1 for sc. Always work into the top of the turning chain on the next row.
The pattern uses positive ease – it's oversized on purpose for that cozy fit. Try on as you go; the top-down style makes adjustments simple.
Count your stitches at the end of each yoke row – increases add exactly 8 stitches per row. If off by one or two, it's usually fine; the fabric stretches.
Work loosely for drape, especially with acrylic yarn. If your gauge is tight, go up a hook size.
Mistakes happen – a dropped stitch or uneven edge hides in the texture. Don't frog the whole thing over small stuff.
Abbreviations Used in This Pattern
Here’s every abbreviation I use, defined clearly:
- Ch – Chain: Yarn over hook, pull through loop on hook.
- Sc – Single crochet: Insert hook into stitch, yarn over, pull up a loop, yarn over, pull through both loops.
- Hdc – Half double crochet: Yarn over, insert hook, yarn over, pull up a loop, yarn over, pull through all three loops.
- Dc – Double crochet: Yarn over, insert hook, yarn over, pull up a loop, yarn over, pull through two loops, yarn over, pull through remaining two loops.
- Sl st – Slip stitch: Insert hook into stitch, yarn over, pull through stitch and loop on hook.
- St(s) – Stitch(es): The individual loops you work into.
- Inc – Increase: Work two stitches into the same stitch (I specify which stitch in the pattern).
- Dc2tog – Double crochet two together (decrease): Yarn over, insert hook, pull up loop, yarn over pull through two, yarn over insert into next, pull up loop, yarn over pull through two, yarn over pull through all loops (used optionally for sleeve shaping).
- Rep – Repeat: Do the instructions again as directed.
- RS/WS – Right side/Wrong side: We don't turn consistently, but RS is the outside facing you at the start.

The Author
I'm Joanna T. Grey. I've been designing crochet patterns for over a decade, and I focus on modern, wearable pieces with clear, tested instructions. Every pattern here is written so you actually understand the why behind each step—not just what to do. Even if you're new or experienced, you'll find practical guidance and designs that work.


